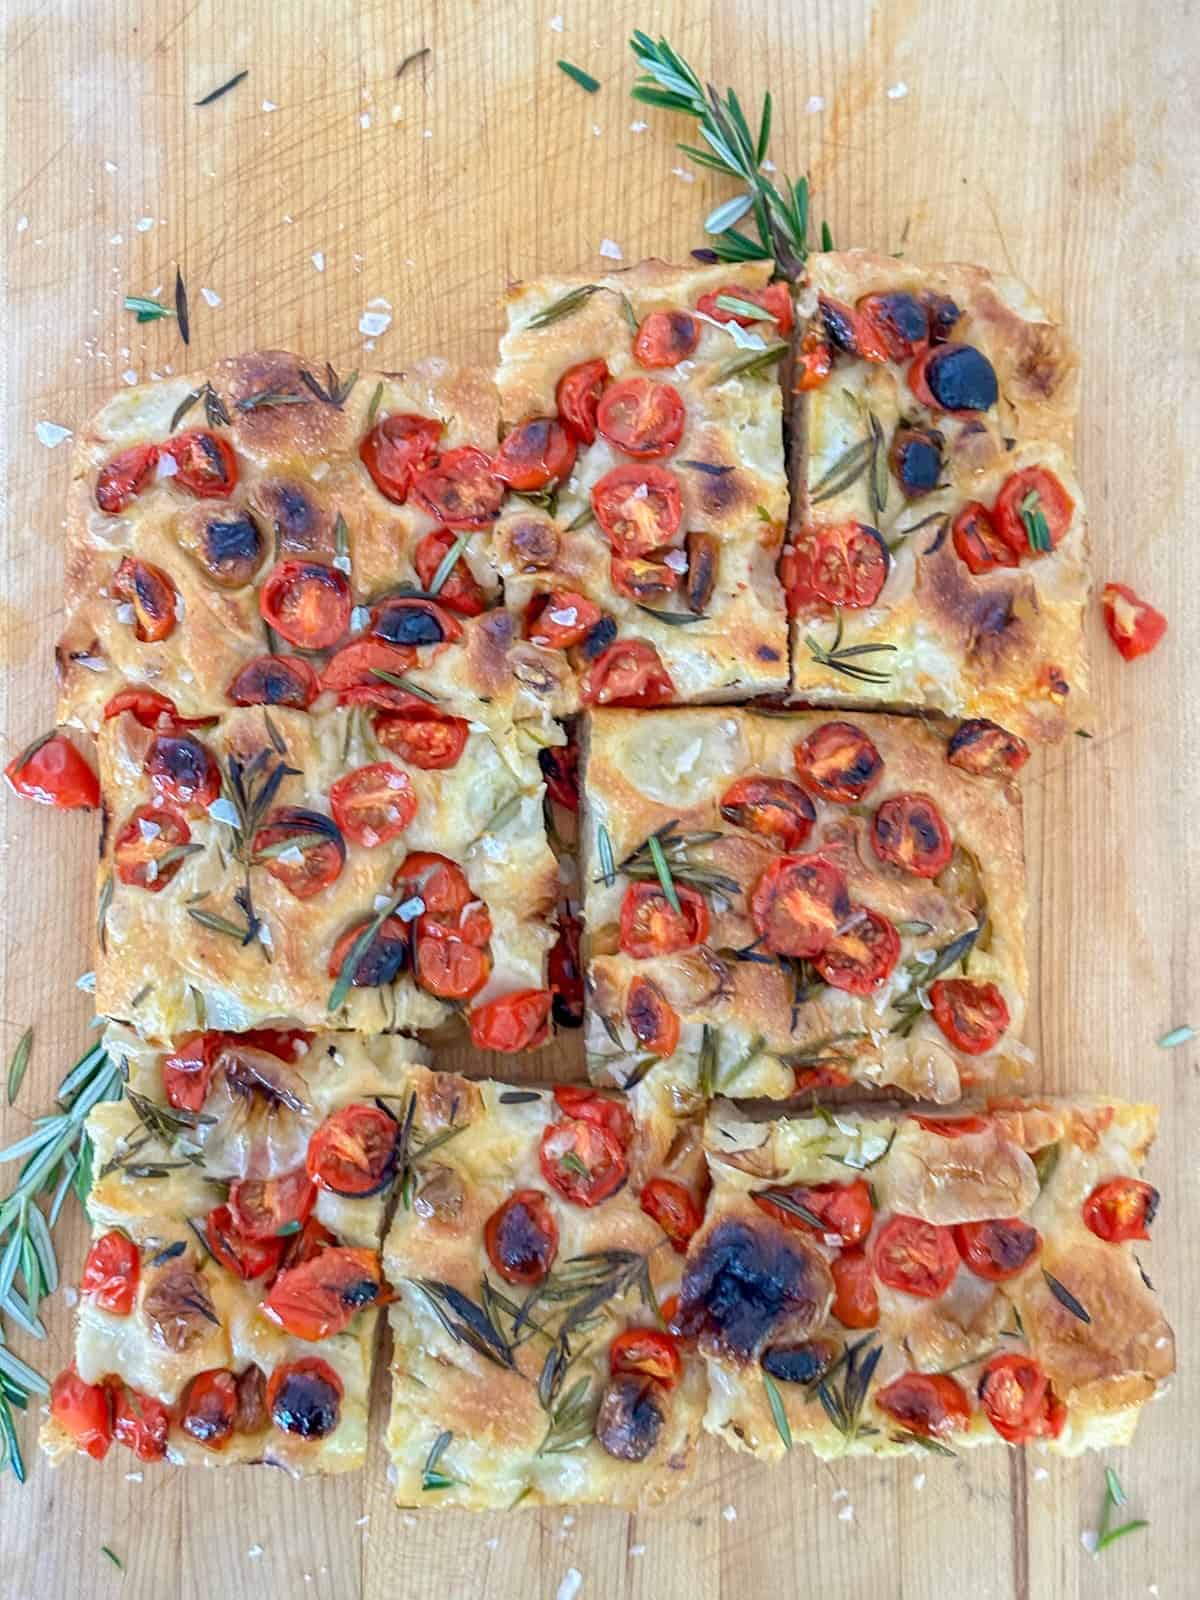
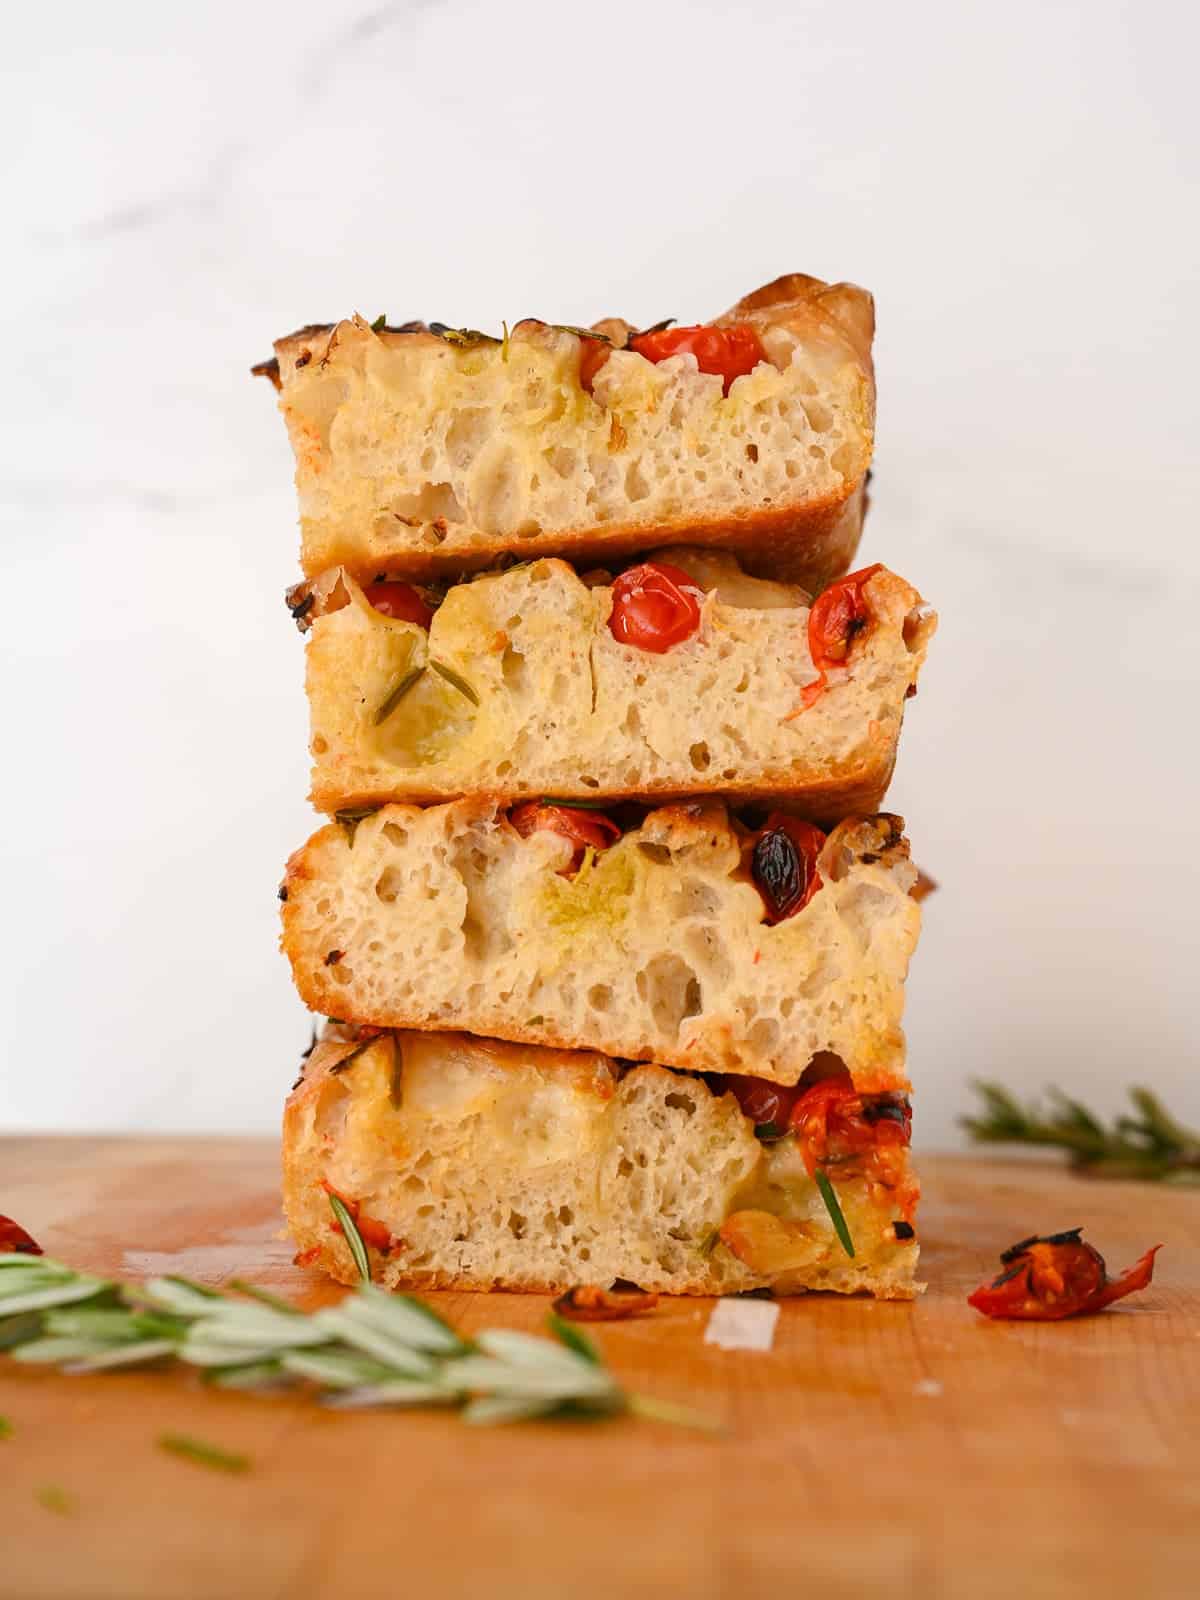
Tomato Focaccia Bread


Tomato Focaccia Bread is an easy-to-make, no-knead focaccia bread. Topped with fresh tomatoes, rosemary, and roasted garlic. Not only is it gorgeous, but everyone loves it! You will seem like a five-star artisan baker.
This bread recipe is ready to bake in about 3 hours if you want to bake it the same day. I’ll also show you how to build even more flavor into your bread by cold-proofing the dough. The slow fermentation method is optional but highly recommended.
Even if you’ve never made homemade bread, this focaccia recipe is easy to follow and even easier to eat.
Don’t forget to pin this recipe to save it for later!
Ingredients You’ll Need
To make focaccia bread, you’ll need a few simple ingredients. The ingredients for this focaccia dough can be used for any focaccia bread recipe.
- Bread flour: High gluten flour is needed to get that tender but chewy texture. You want to use flour that is 12-14% protein.
- Instant yeast: Make sure your water is warm but not too hot. If you have a thermometer, your water should be no hotter than 110℉.
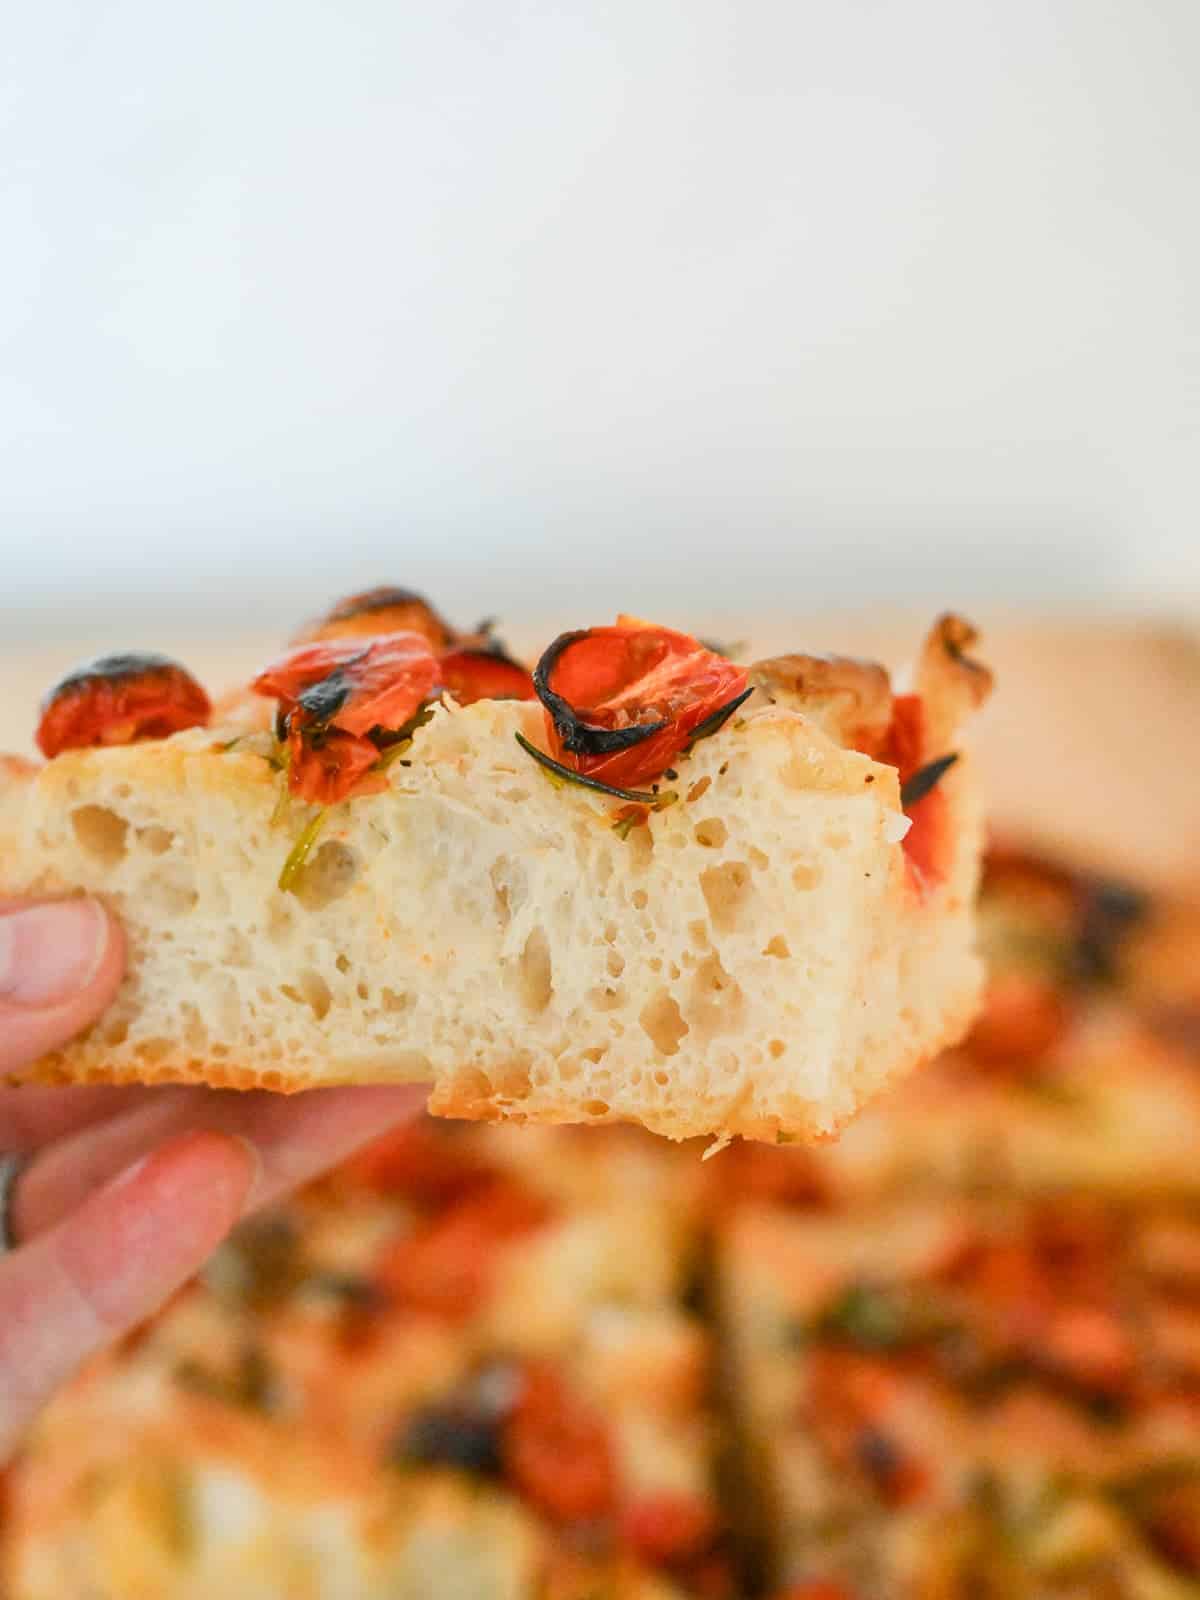
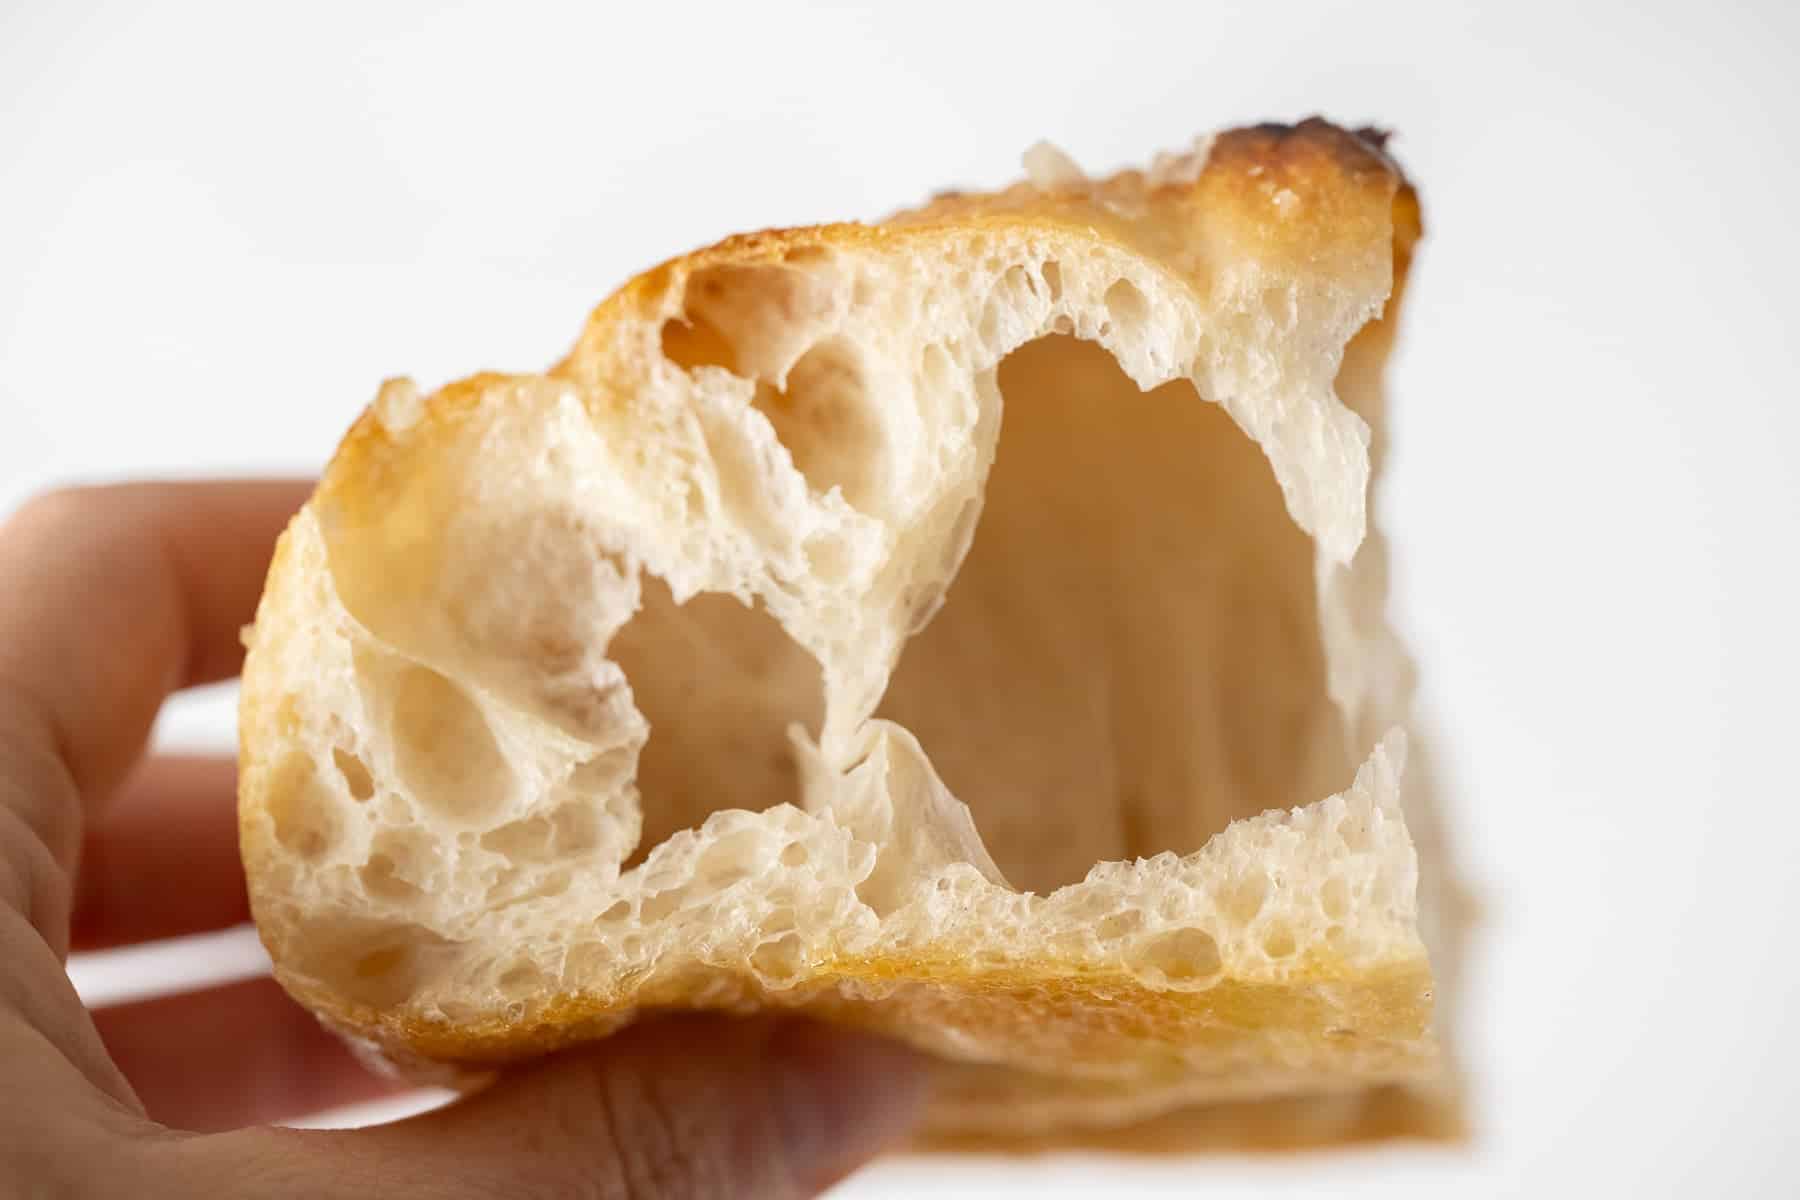
- Water: Use lukewarm water. Focaccia bread is a high-hydration dough. At around 80-88% hydration, this dough will be sticky. The high hydration allows for the large air pockets when rising.
- Kosher salt: Kosher salt or sea salt.
- Olive oil: This recipe requires lots of extra-virgin olive oil.
Ingredients for focaccia topping
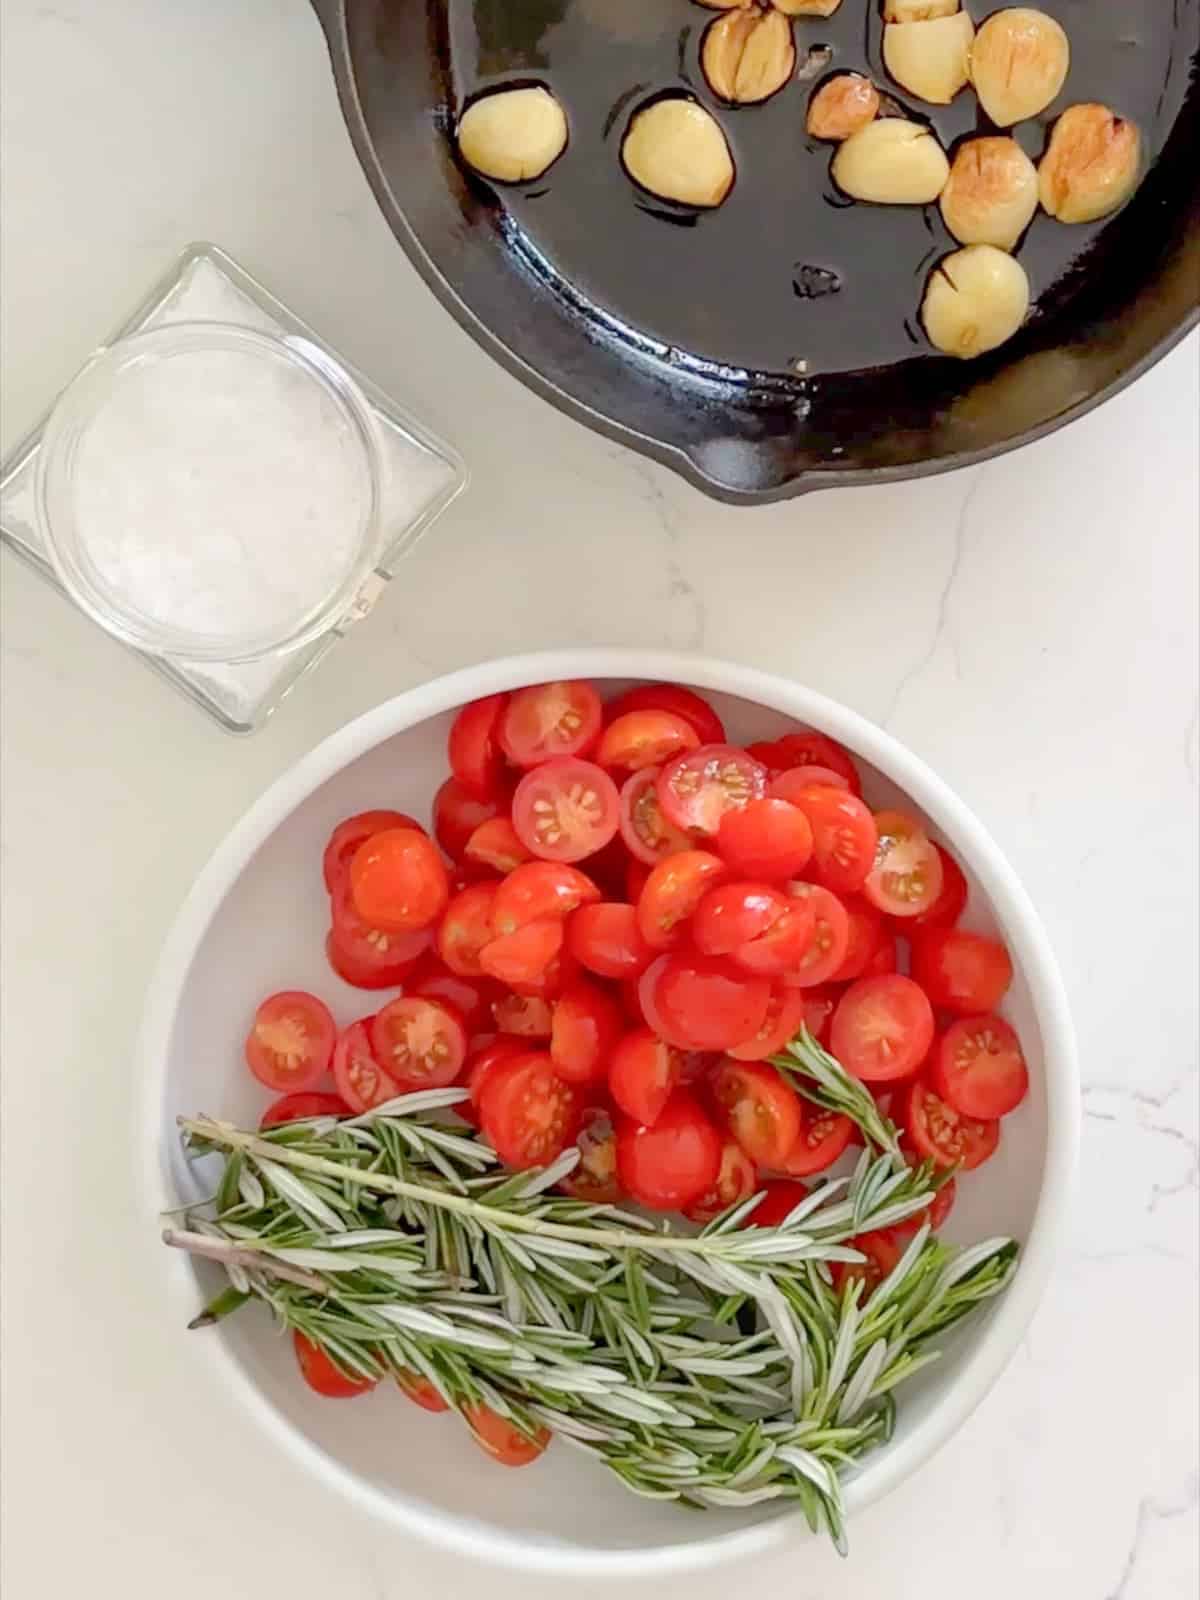
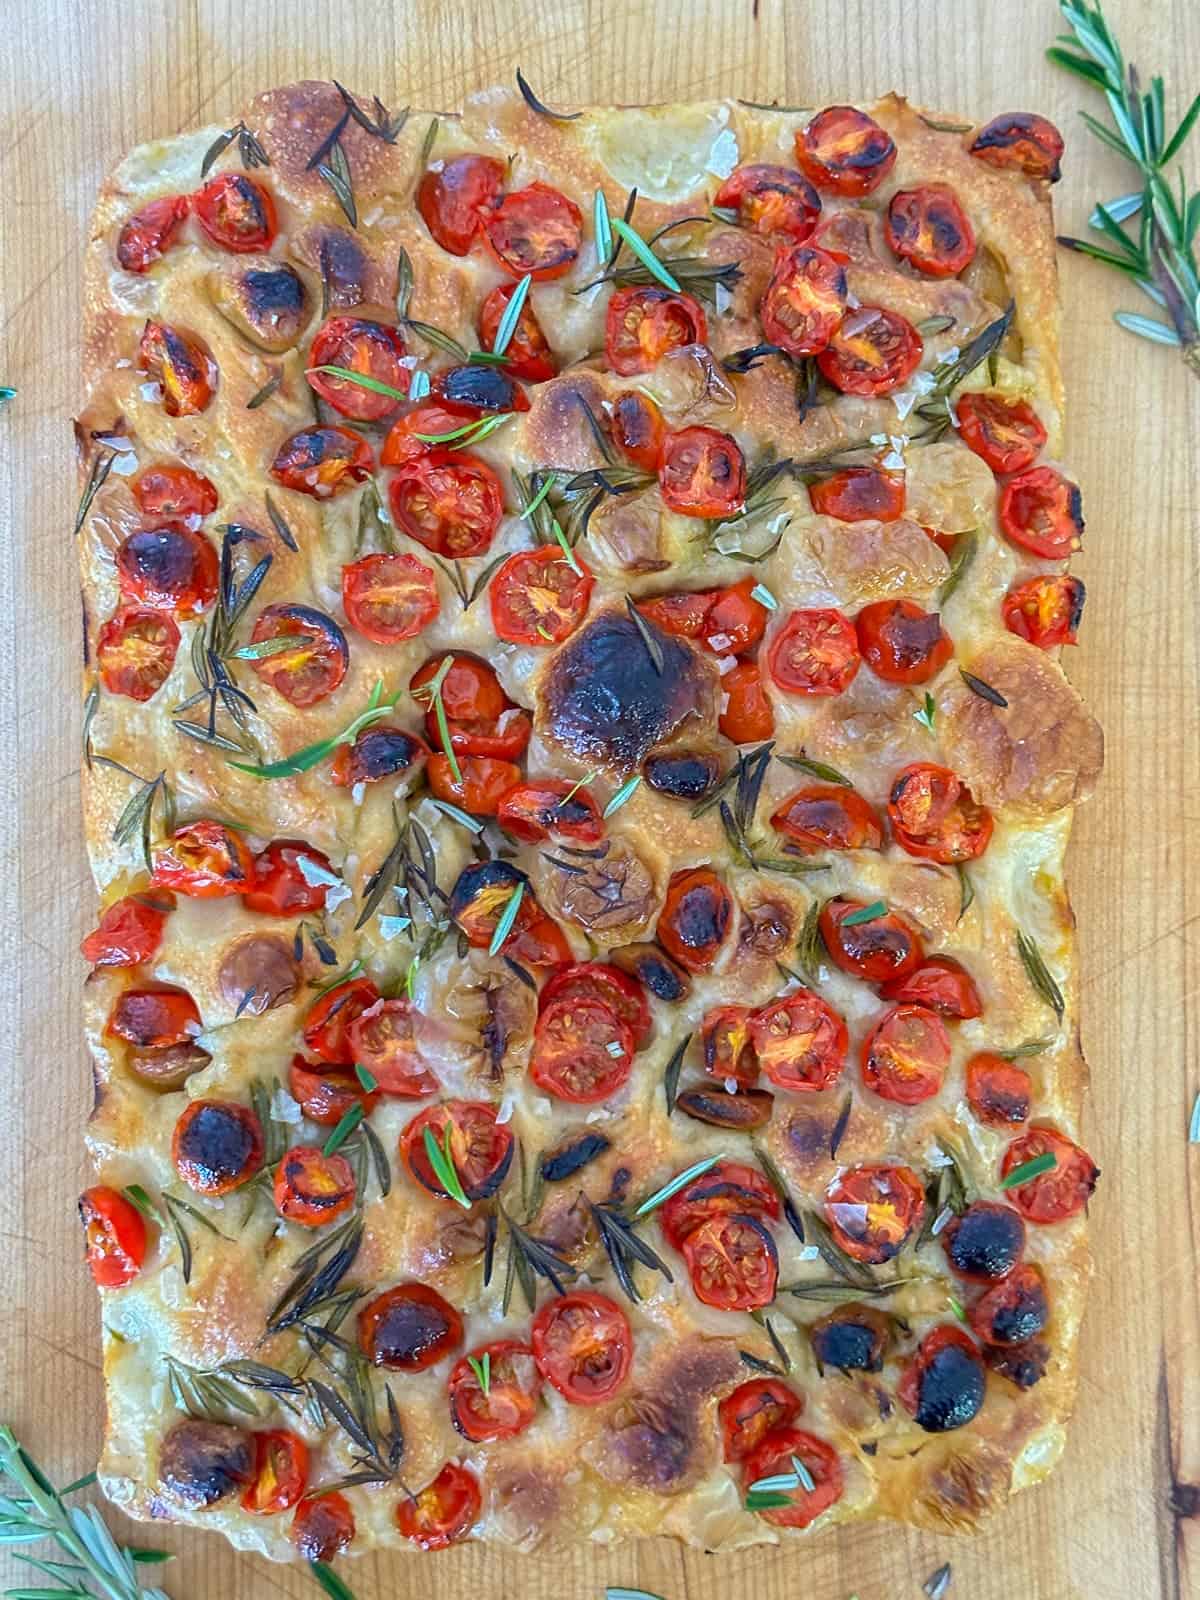
Try a variety of focaccia toppings like rosemary or tomatoes and roasted garlic.
- Olive oil: Focaccia is traditionally finished with extra virgin olive oil on the bread.
- Flaky sea salt: Flake salt adds flavor and a nice crunch to freshly baked focaccia bread.
- Roasted garlic cloves: You can roast the garlic cloves yourself or use pre-roasted garlic cloves available in the produce section.
- Fresh rosemary: Top with rosemary, flakey salt, and olive for a beautiful herb focaccia.
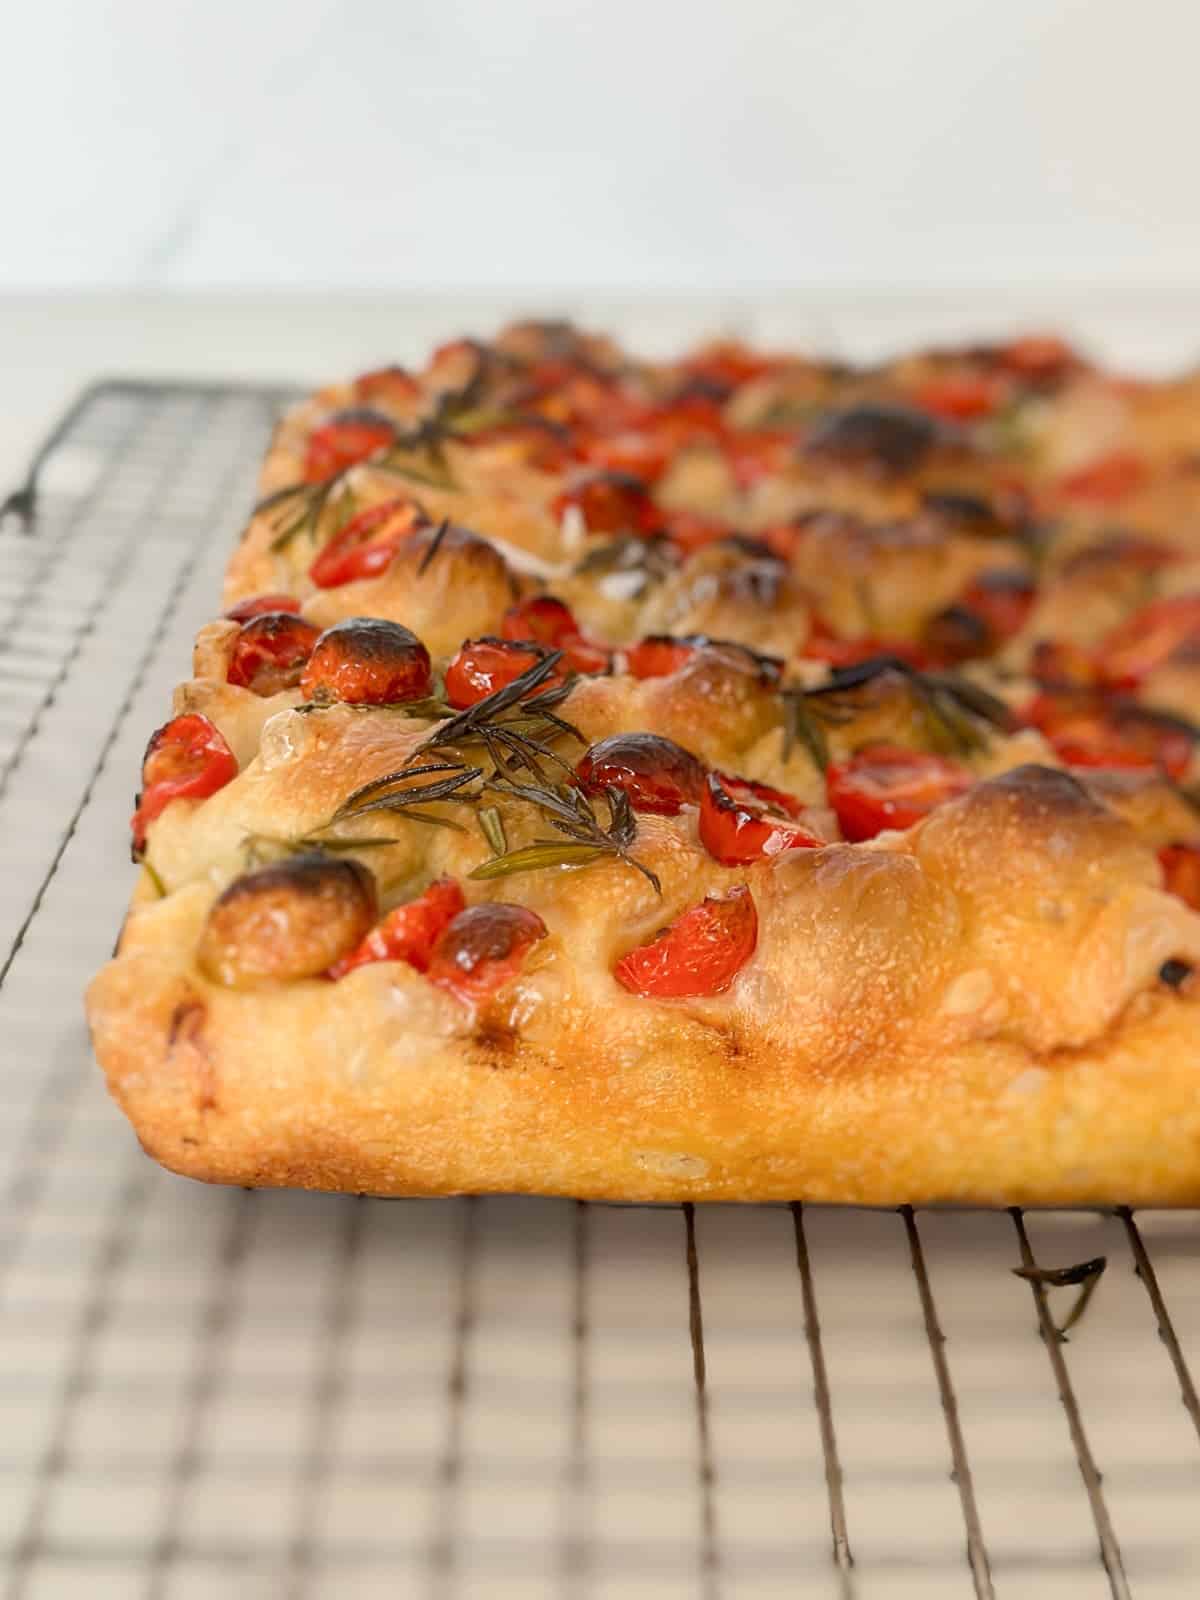
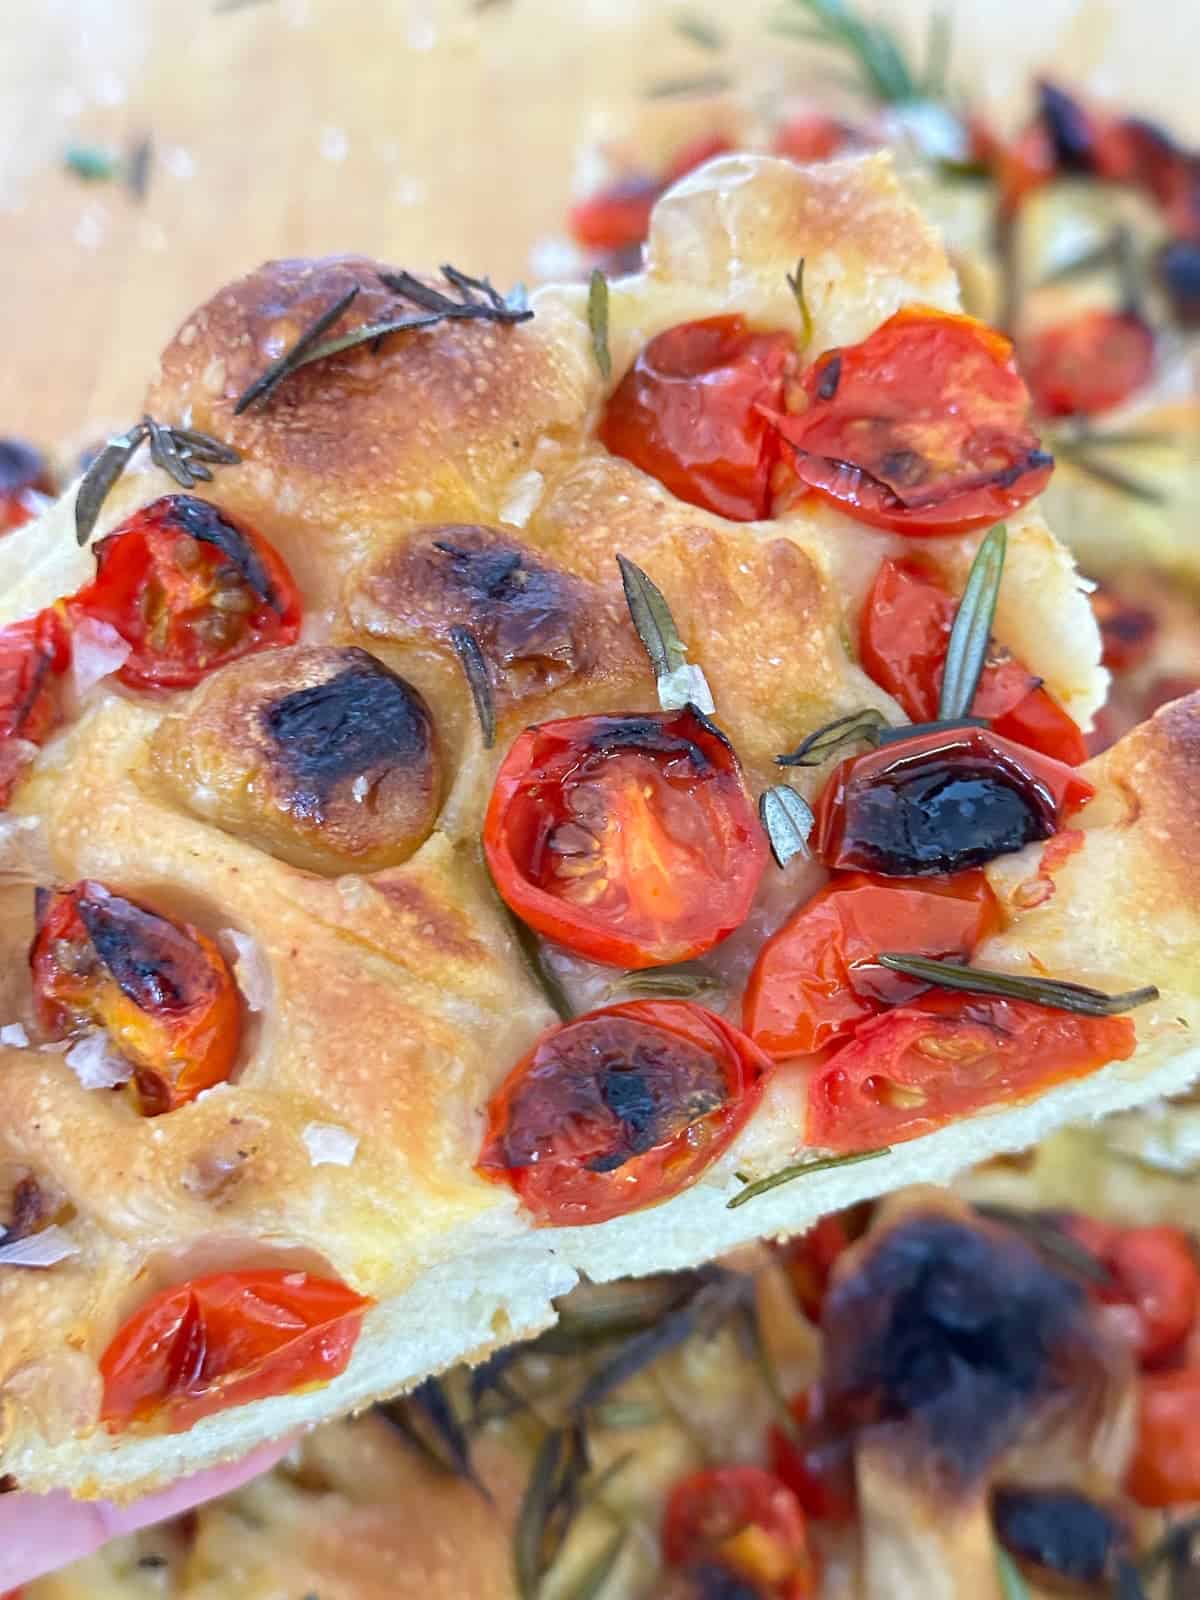
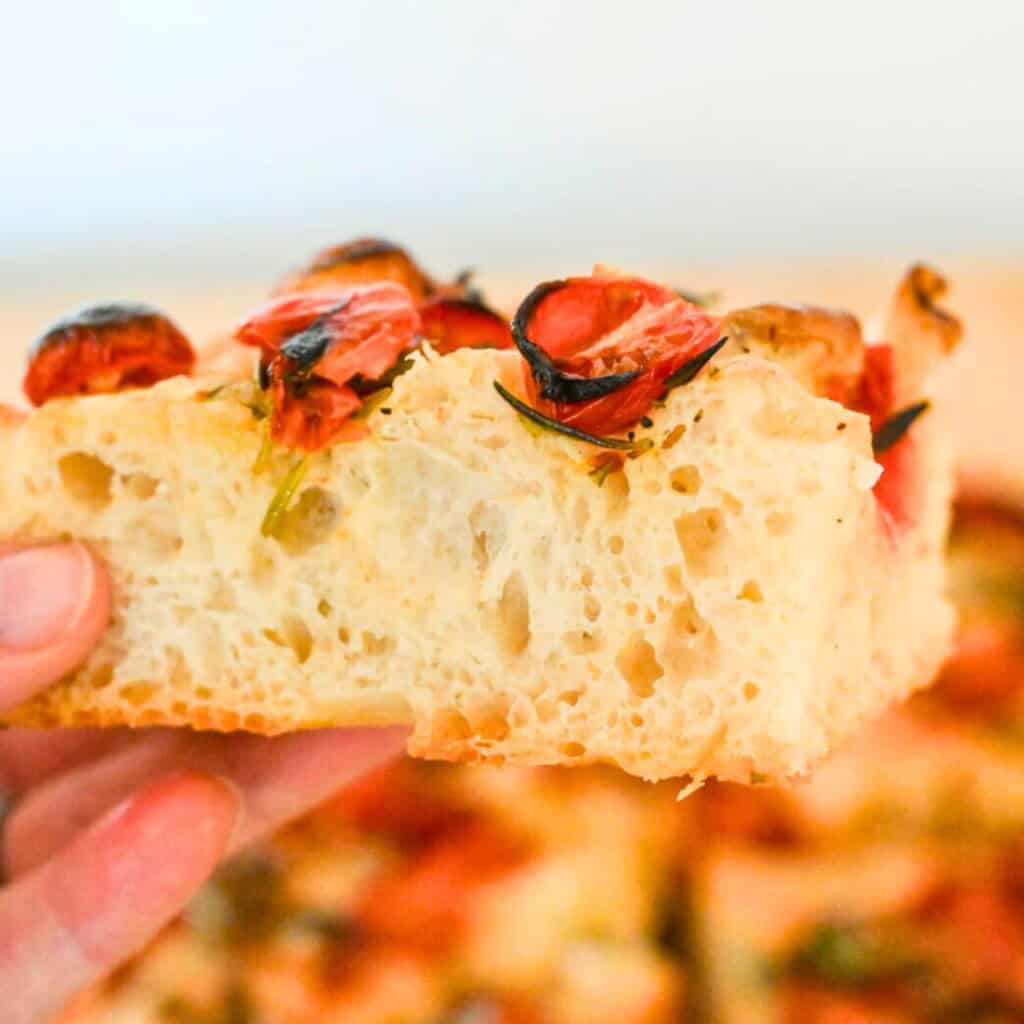
- Cherry tomatoes: Tomato focaccia bread is baked with fresh tomatoes. The tomatoes roast and caramelize during the baking and add a sweet but savory element to this focaccia bread recipe.
Step By Step Instructions
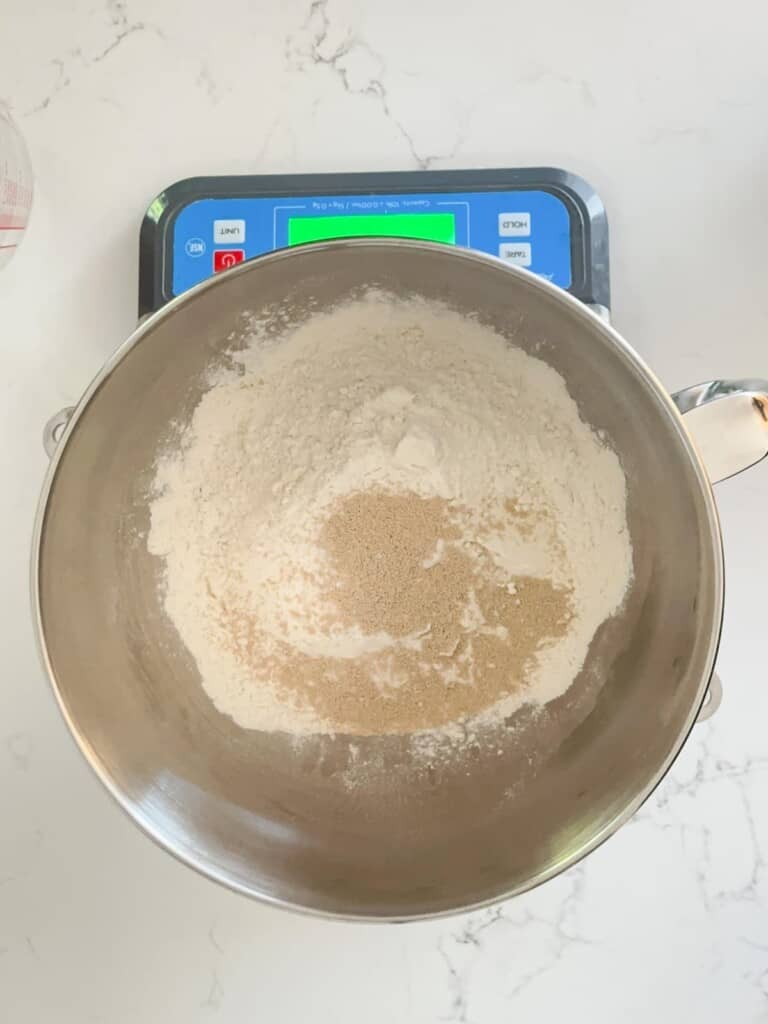
Step 1—Combine the Ingredients:
Add all the bread ingredients to a bowl. If you have a scale, weigh the ingredients directly into the bowl.
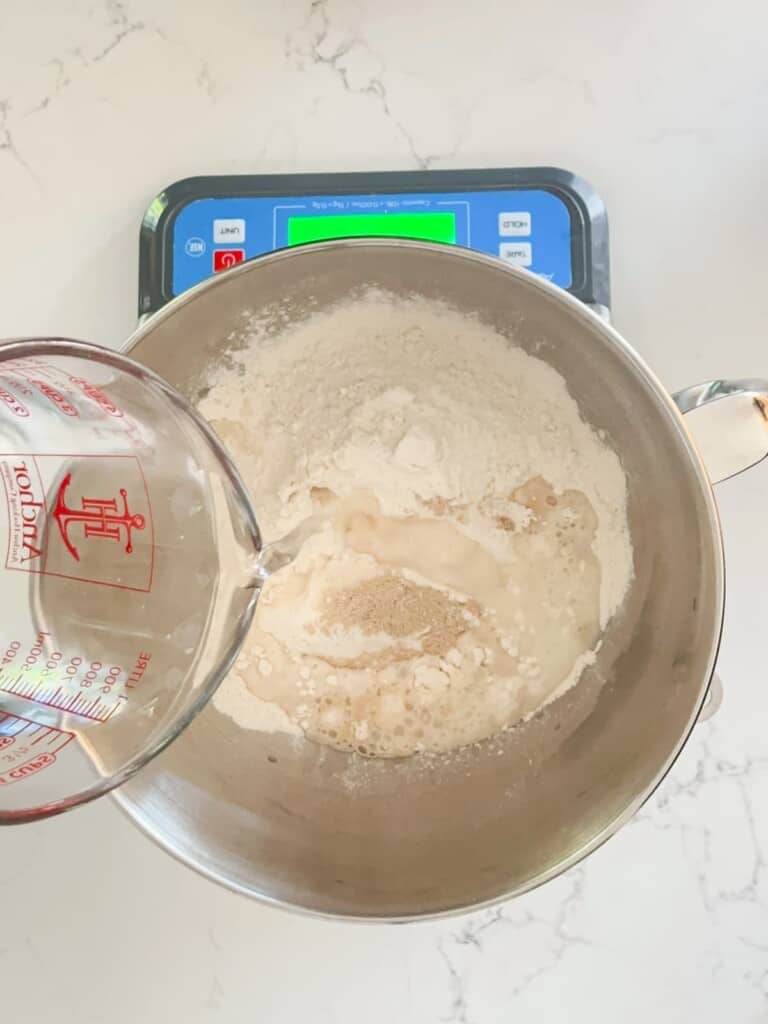
Step 2—Mix the Dough:
Mix the dough with a wooden spoon. The dough will be very wet and sticky.
Step 3—First Rise:
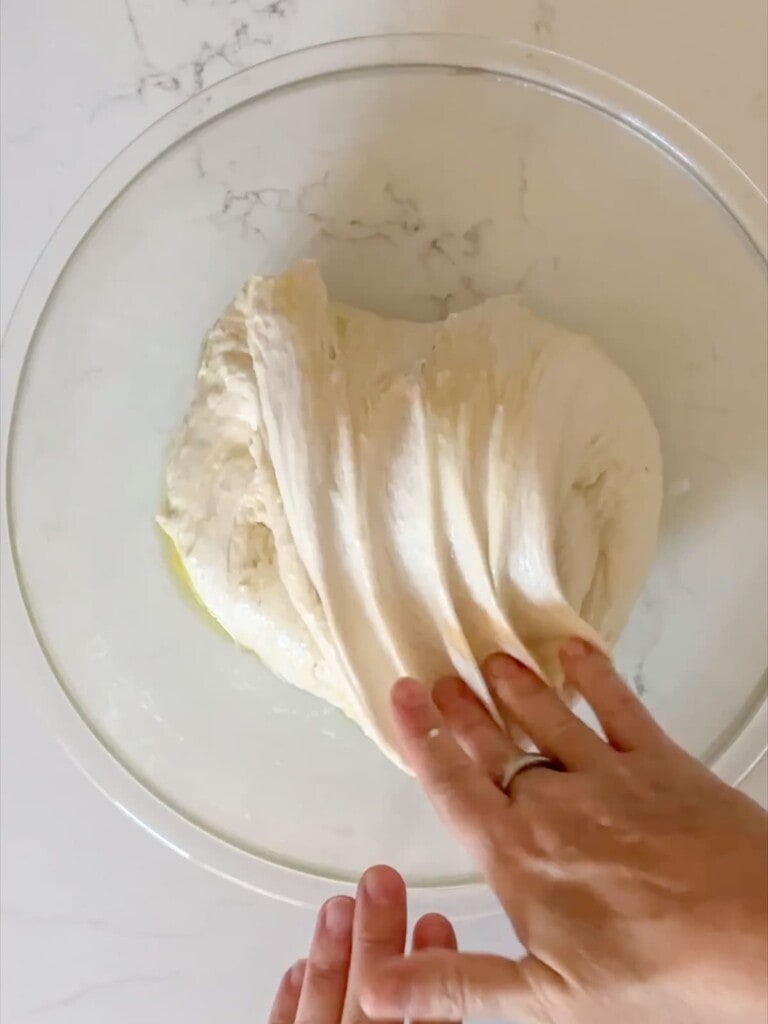
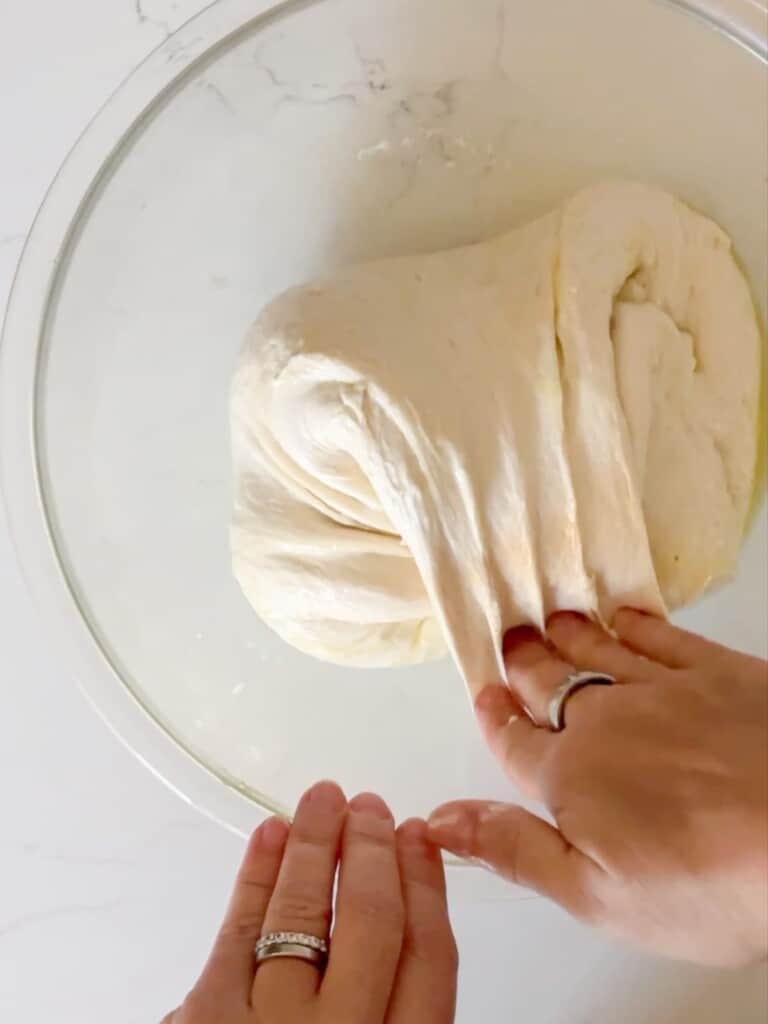
We will be using the pull-and-turn method to develop gluten and large air pockets. Let the dough rest for 30 minutes. After 30 minutes, use hands moistened with water to pull one corner of the dough to the opposite side. Turn the bowl one-quarter, and repeat 3 more times. Recover the bowl and let it sit for another 30 minutes. You will repeat this process 3 times for a total of pull-fold-turns.
Step 4—Preheat your oven:
Set the oven racks to the lower middle position. If you have a bread stone, use it. Set the oven to convection bake and preheat 400℉/204℃.
Step 5—Second Rise:
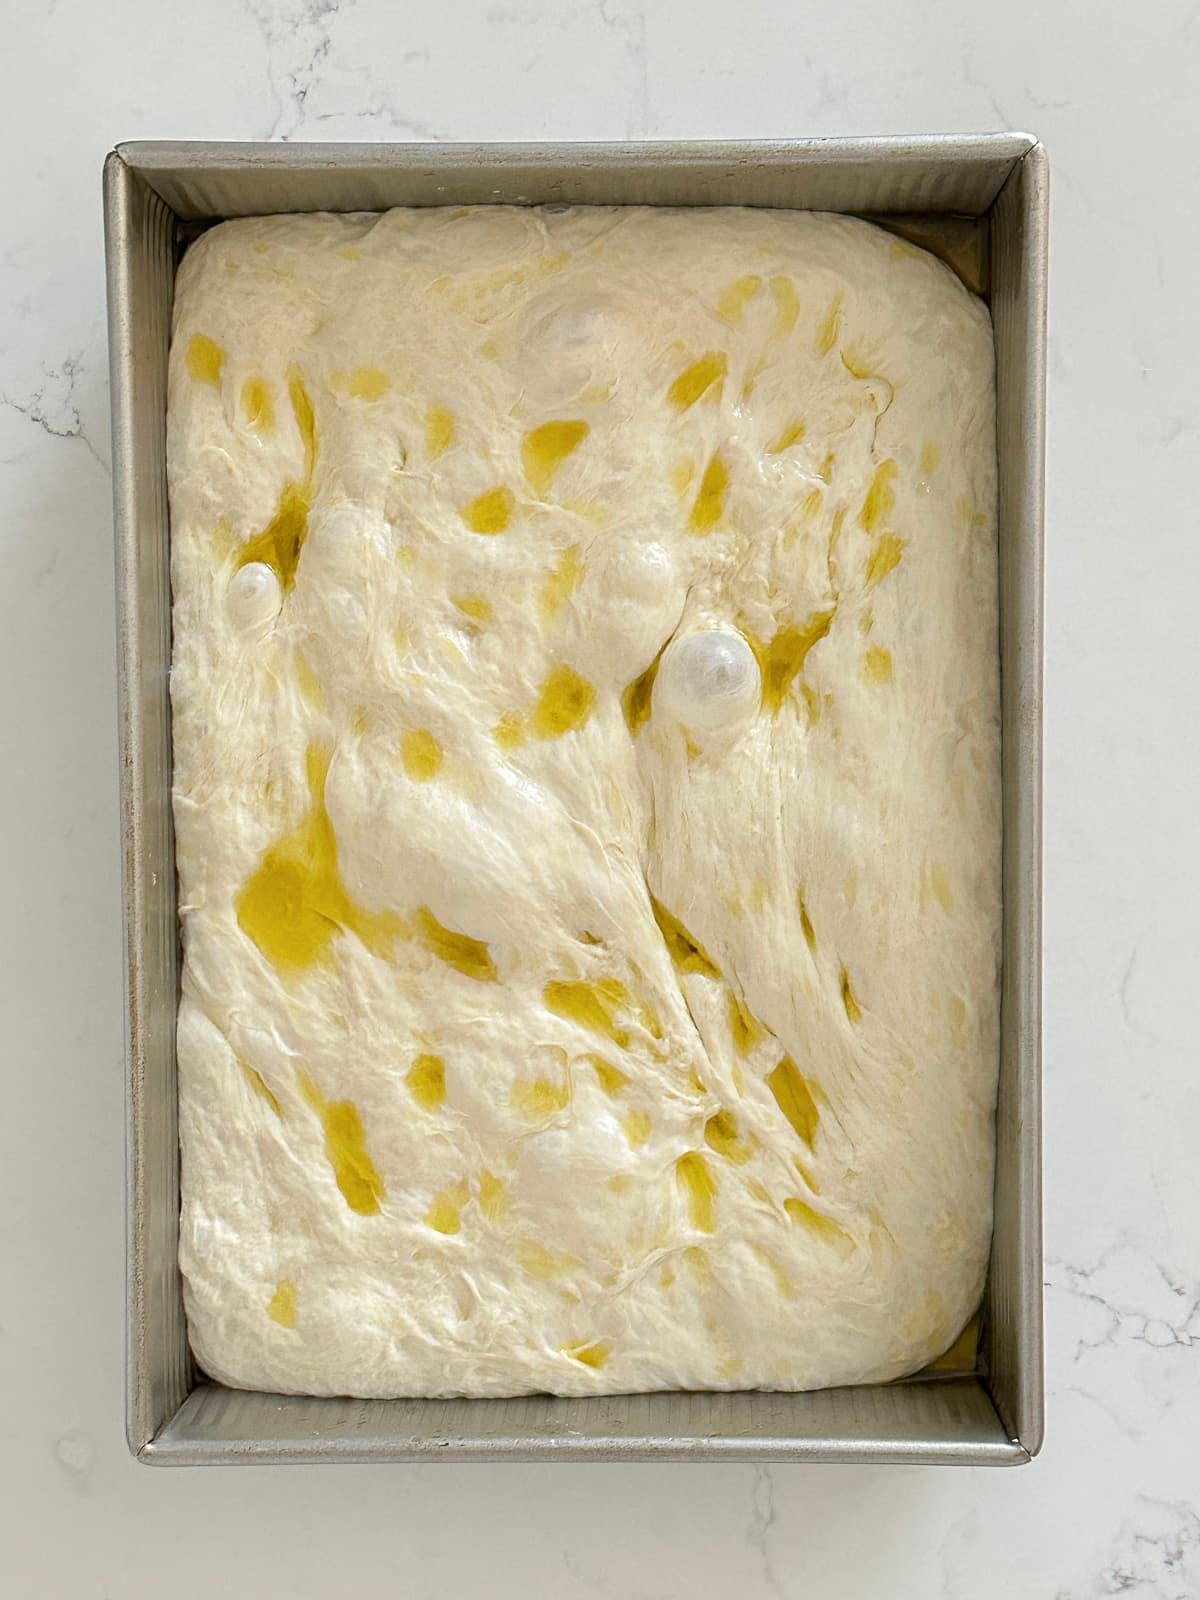
Prepare a 9×13-inch baking pan. Generously oil a 9×13 baking pan. Gently dump the dough into the baking pan. Drizzle more olive oil onto the top of the dough. Cover the pan with plastic wrap and cover with a kitchen towel OR an inverted, rimmed baking sheet. Allow the bread to rise for one more hour.
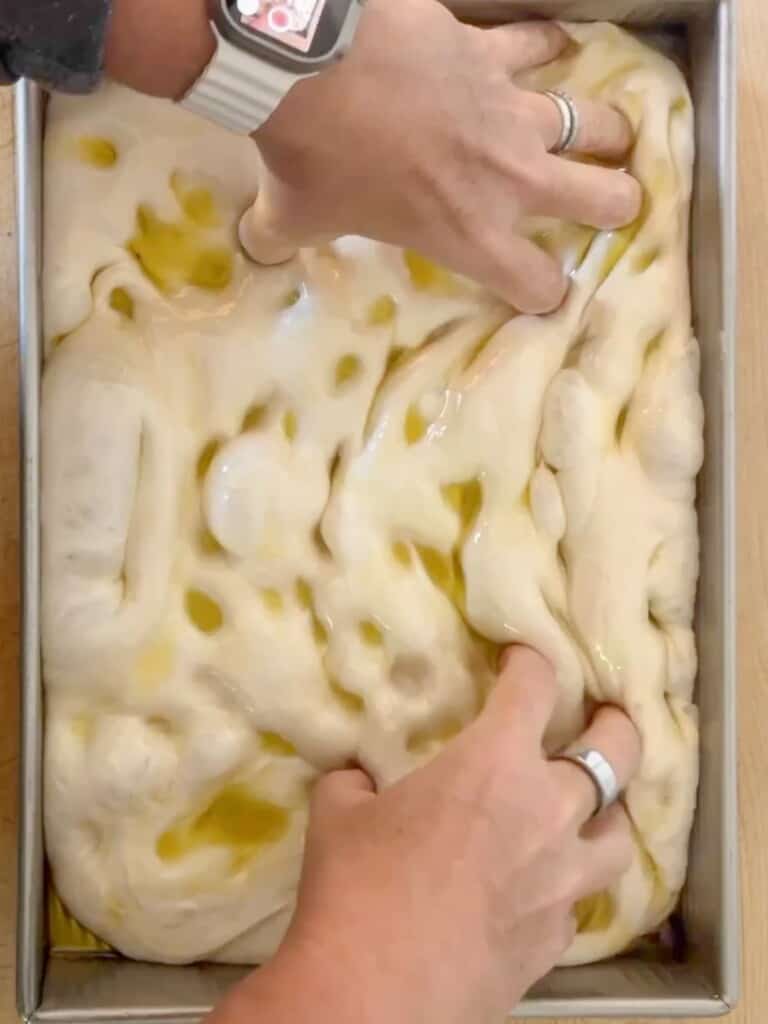
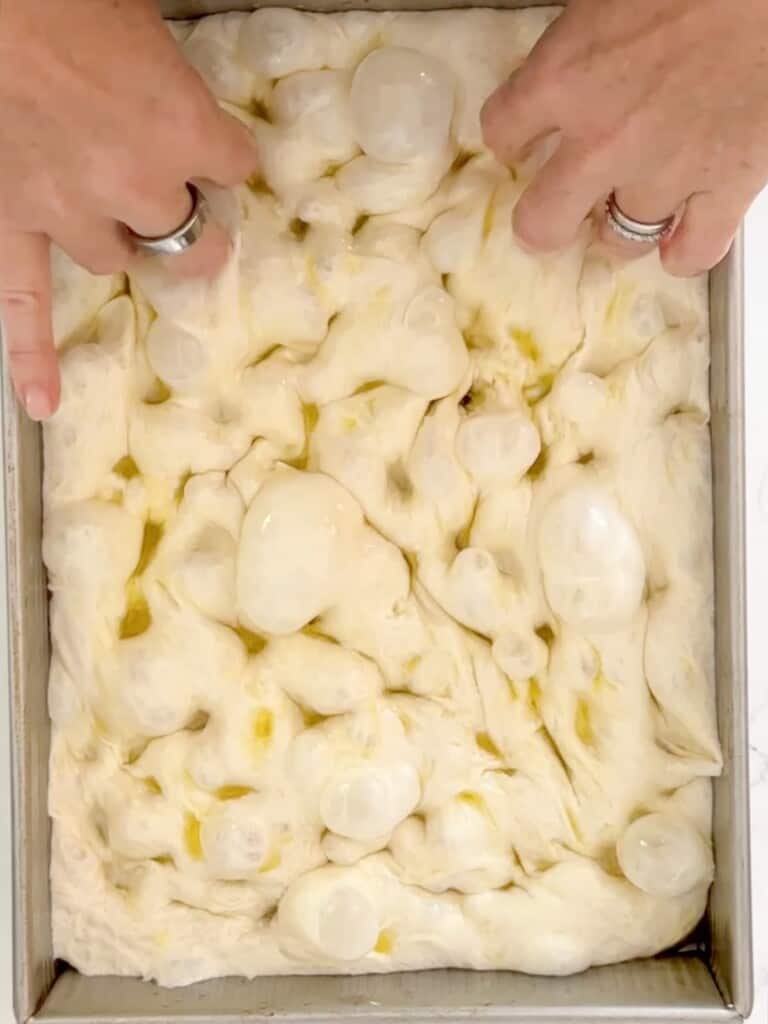
After one hour, drizzle the top of the dough with even more olive oil. Cover your fingertips in olive oil and press your fingertips into the surface to dimple the dough. You want to press and jiggle to encourage the air to rise to the surface of the dough.
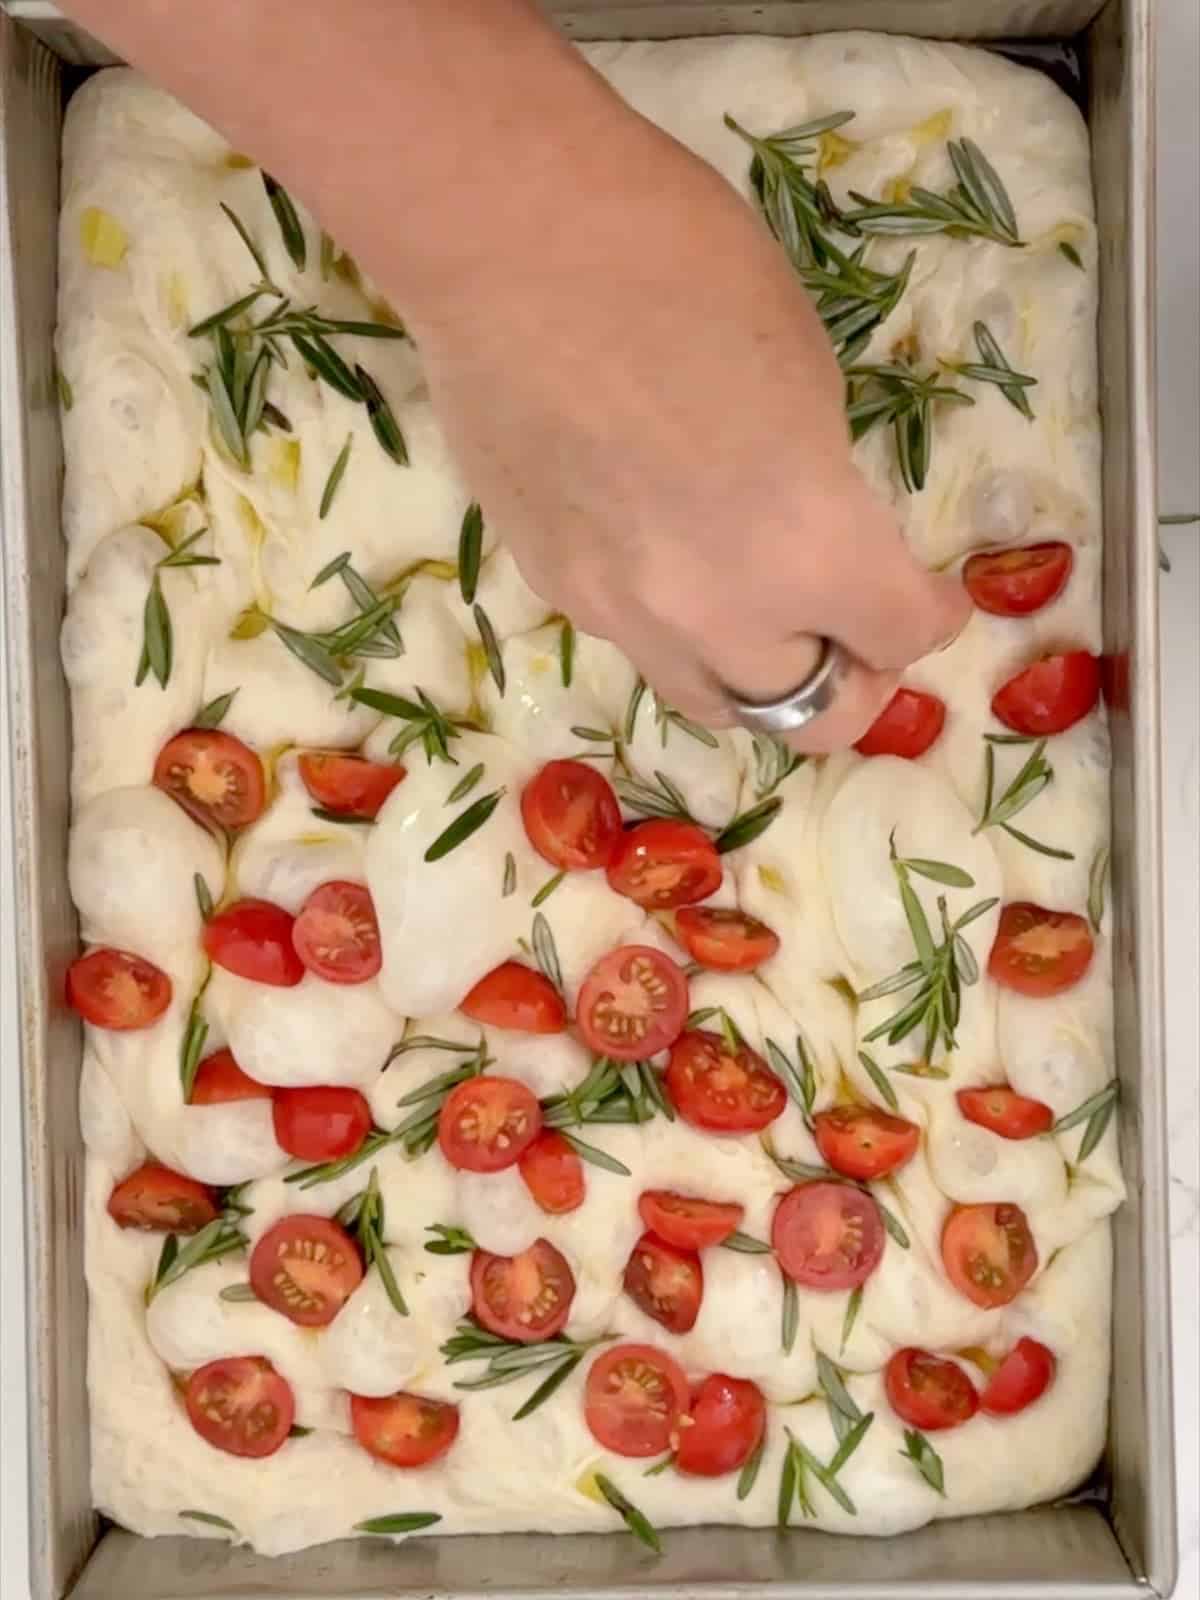
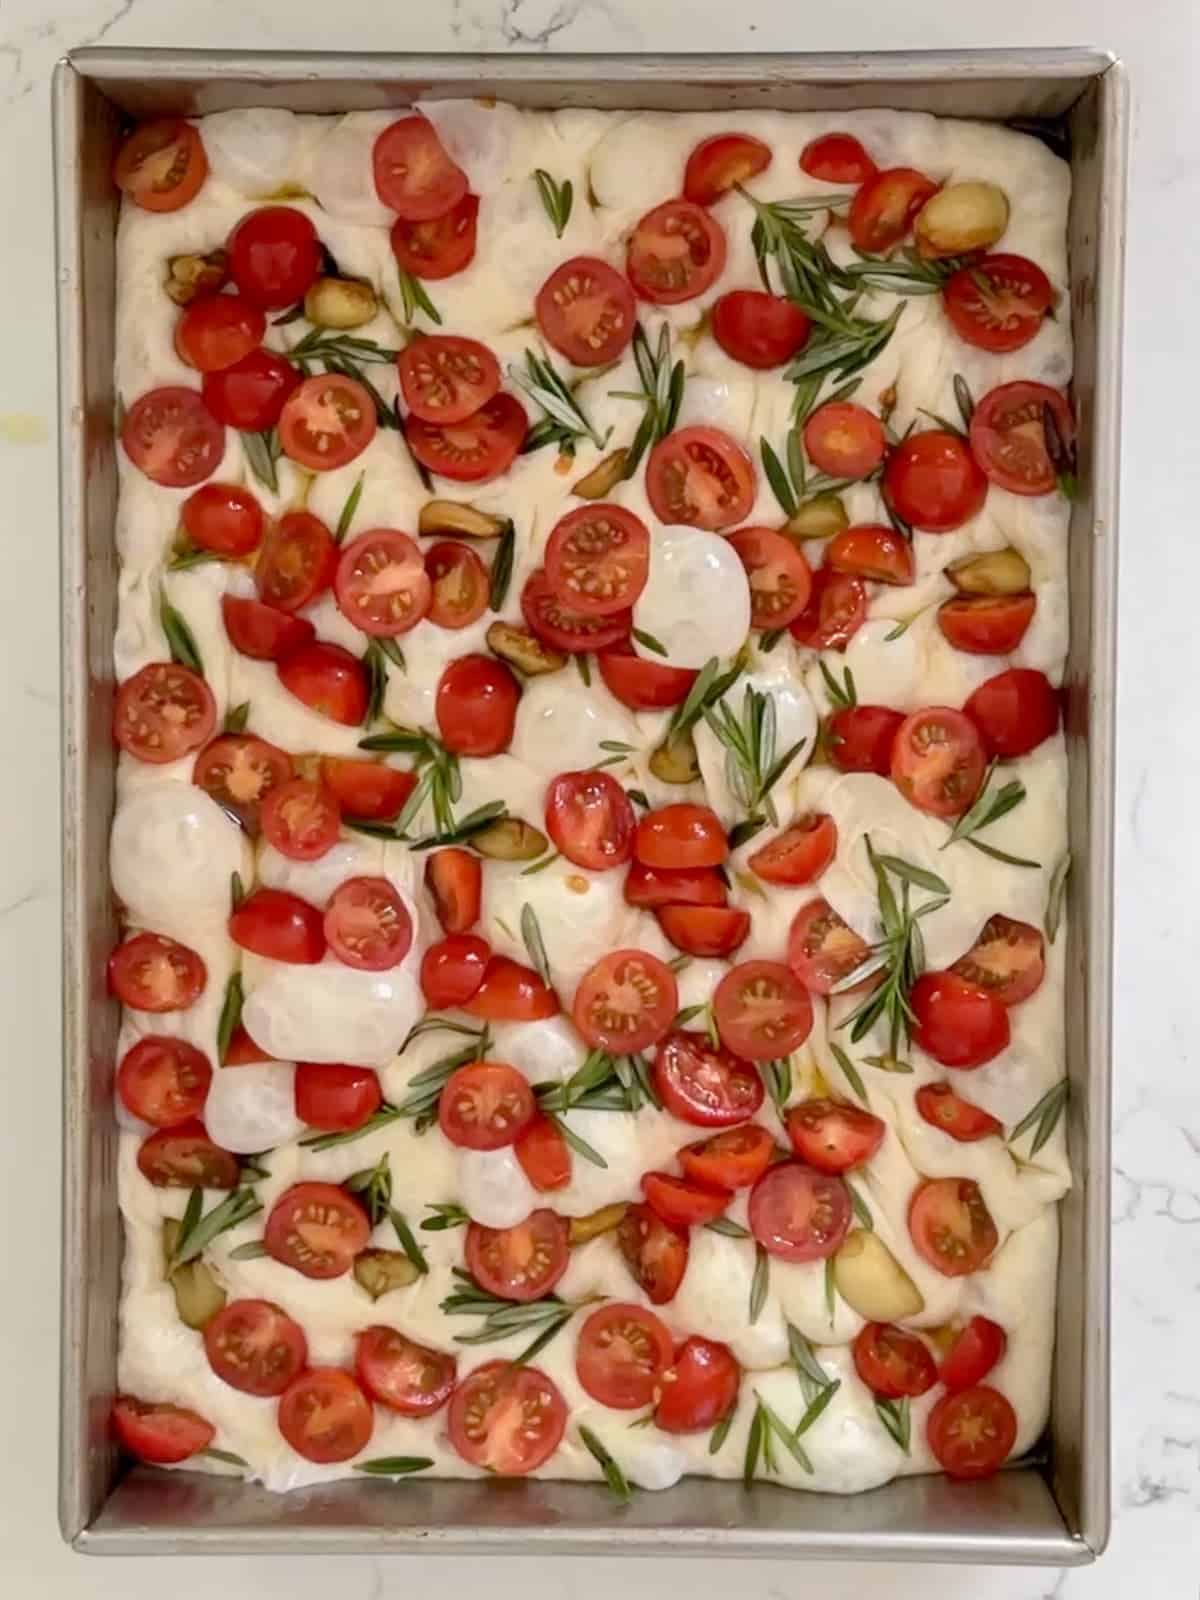
Add your toppings to the top of the dough. Make sure the toppings are oiled so that they don’t burn. See below for suggestions on the best toppings for focaccia bread.
Step 6—Bake:
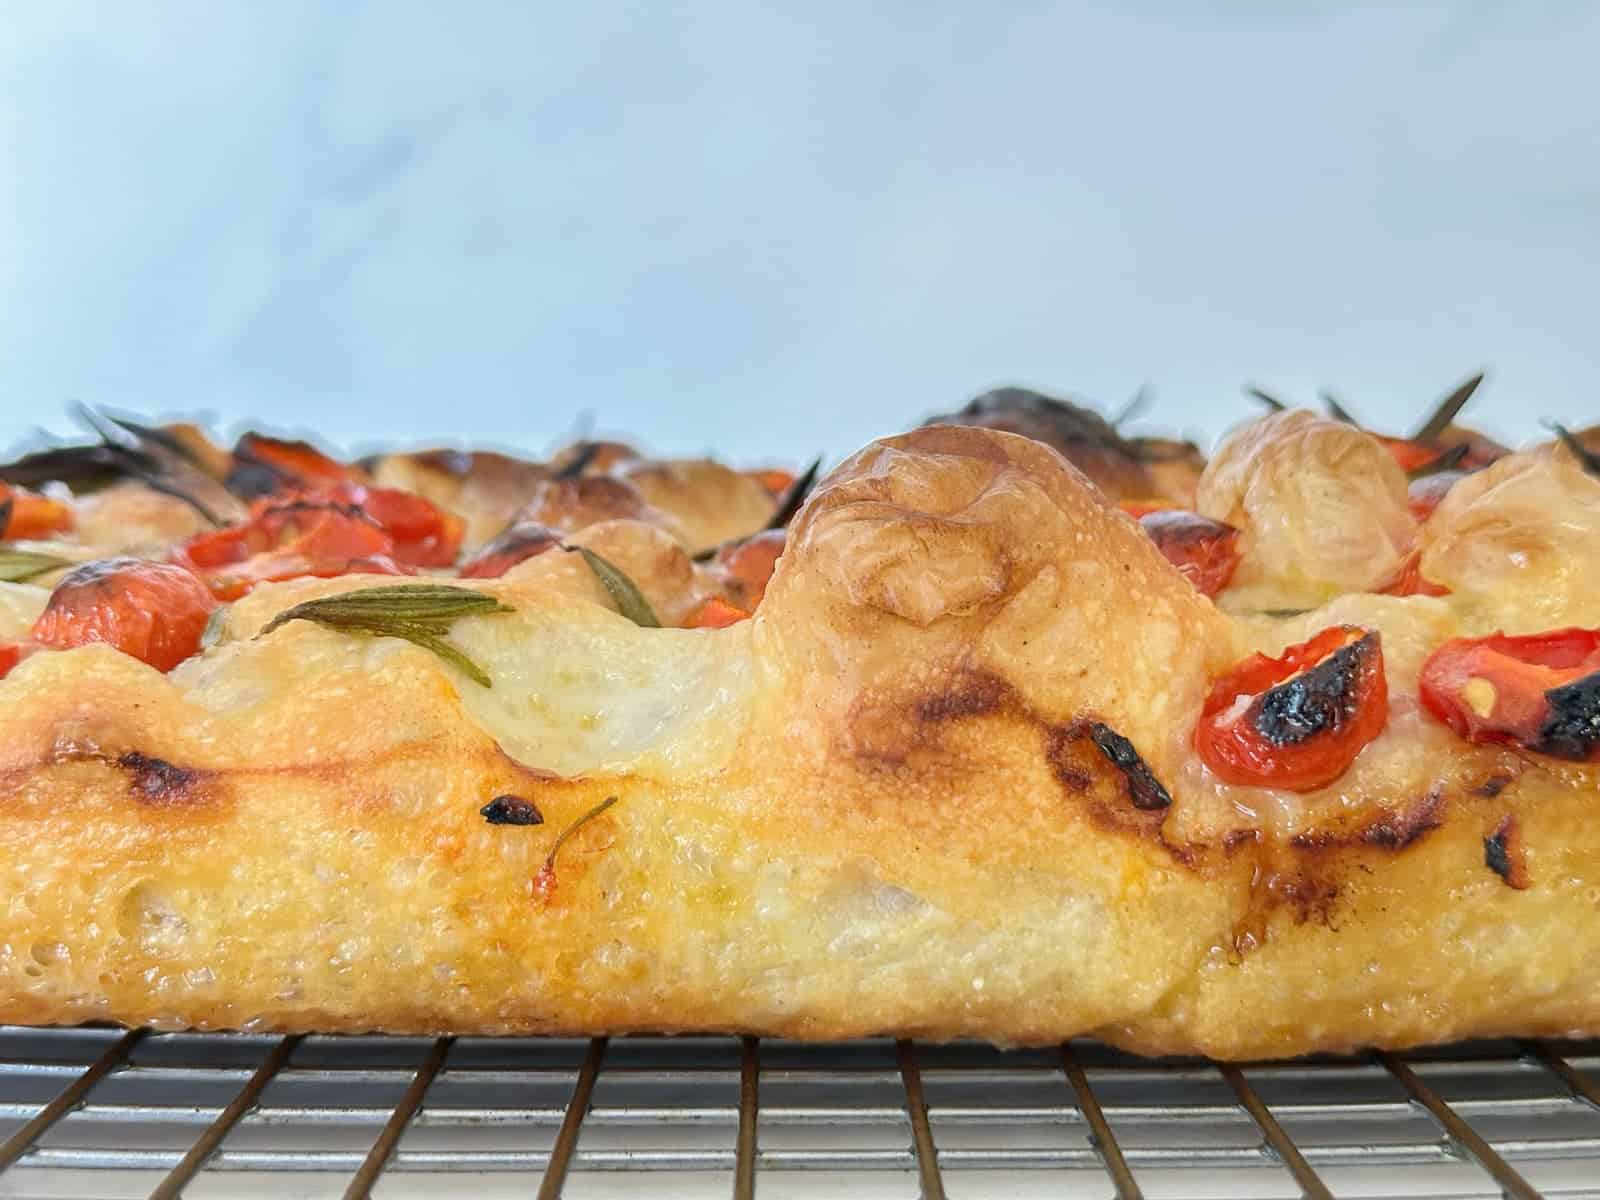
Bake the focaccia for 25-30 minutes until golden brown.
Rest the bread for 10 minutes in the pan and then transfer it to a baking rack to cool. Cool for 15 minutes before slicing.
Tips For Homemade Focaccia Bread
- Use high-quality bread flour: I recommend King Arthur Brand in the US. The high amount of gluten protein is essential for creating a pillowy dough with deep air pockets. The high-protein flour also gives you the right texture and chew, for which focaccia bread is famous.
- Measure the ingredients with a scale: Measuring accurately with a scale will always give you the most reliable and consistent results when making bread.
- Get the right hydration: The bread structure is built on hydration percentage. This is the ratio of flour to water. Focaccia bread should be 80-88% hydration. For example: [grams of bread × 0.80 = grams of water needed for 80% hydration]
- Use warm water: Warm water helps to ensure the bread rises properly. I usually microwave the water for about 1 minute in the microwave and then measure the temperature. Shoot for 100-110℉. If the water gets too hot, add a little cool water to decrease the temperature.
- Get the proper dough rise: Giving bread enough time to rise is essential to get the right texture. If the dough is underproofed, it will be dense and feel dry. If the dough is over-proofed, the bread will go flat.
- Lots of olive oil. Focaccia bread loves olive oil. Be generous with it. Add olive oil to the bottom of the pan, and then drizzle olive oil over the top of the dough.
- Bake using convection: I highly recommend using the convection fan if you have a convection oven.
- Use a bread stone: The hot bread stone adds an extra boost of heat when the bread is first put into the oven. This causes rapid air expansion and creates larger bubbles in the bread dough.
You can read more about the science of gluten and flour here if you are as geeky as I am.
Troubleshooting Focaccia Bread
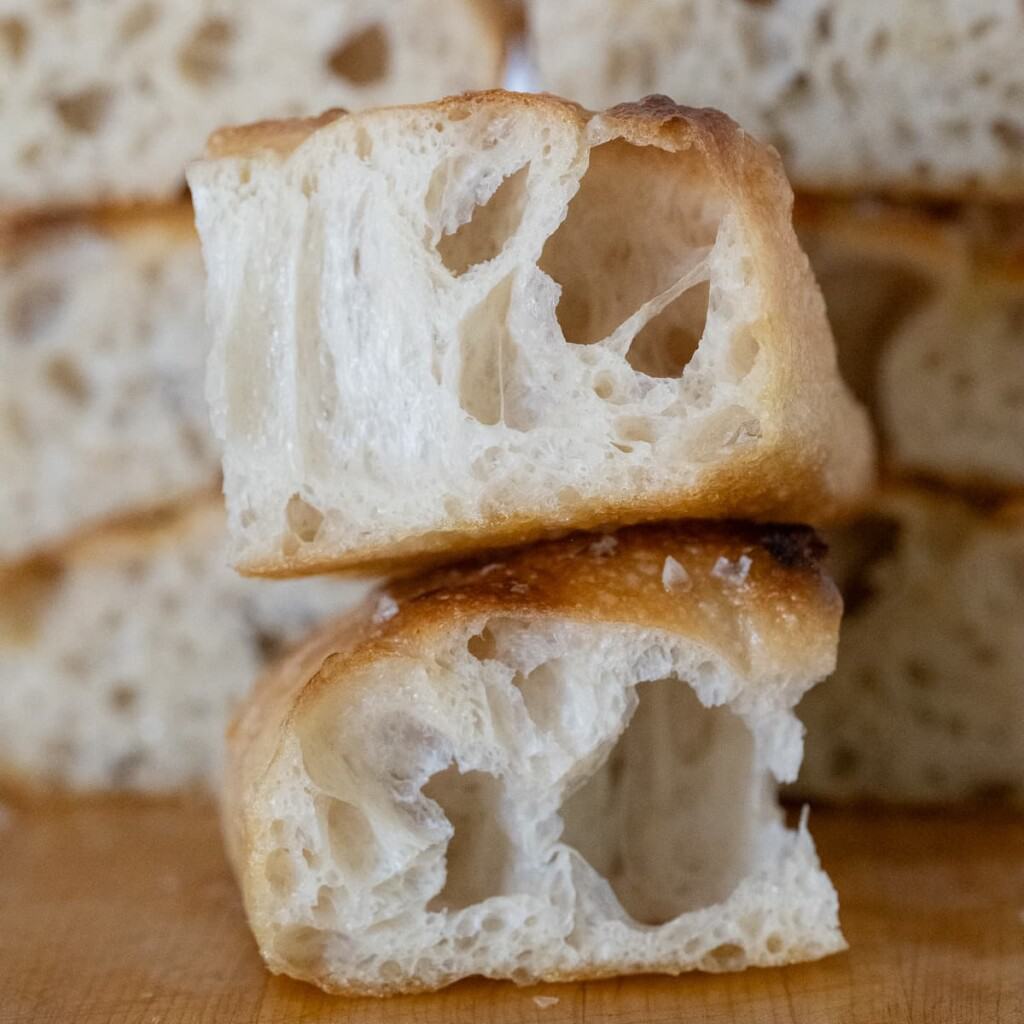
Focaccia bread is meant to have a light, chewy texture punctuated by its signature air pockets. Focaccia dough is made with a high-hydration dough. This extra moisture in the dough contributes to the light, airy texture and large air pockets.
- Dough texture: After mixing, the texture of the dough should be relatively wet and very sticky. Use well-oiled hands to touch it so it doesn’t stick to you.
- Proofing: Focaccia dough requires two stages of proofing or rising.
- The First Rise: The first rise is done in a covered bowl. For same-day baking, the first rise is done at room temperature or in a proofing drawer set to 100℉. The first rise can also be performed as a cold-proof. The cold-proof is done in the refrigerator overnight (up to 3 days). Cold-proofing the dough develops considerable flavor and is well worth it if you have the time. If you cold-proof, make sure the dough is slathered with olive oil and is covered with plastic wrap.
- The Second Rise: The second rise is done in the baking pan. For same-day baking, the second rise takes about 30 to 40 minutes. If you’ve cold-proofed the dough, the second rise will take about 3 to 4 hours. Since the dough has been taken out of the refrigerator, it takes longer to come to room temperature and then develop air bubbles.
- Bubble: The temperature in your kitchen and the temperature of the dough play a huge role in how long it takes to get the right rise. The yeast releases CO𝟮 into the dough. The CO𝟮 is responsible for the formation of air pockets. If the dough is too cold, it will take longer for these bubbles to develop. Making bread is all about learning to detect the right textures in the dough.
Recipe Variations
Keep in mind that the basic recipe for the bread can be made plain without all of the focaccia toppings. The great thing about making focaccia bread, besides its so easy, is that you can make it however you want. You can make it on the thicker side if you like a soft and fluffy chunk of bread, or you can roll the dough out a bit thinner, which is usually my preference.
Use your imagination and get the kids involved. Teaching kids to cook is a life skill they will thank you for later, and it’s a fun project to bond over. You get to teach math and science and have fun. Plus, you get a delicious reward in the end.
- Everything Bagel Seasoning
- Fresh herbs like rosemary for a classic rosemary focaccia bread
- Caramelized onions and ricotta
- Kalamata olives and fresh oregano
Serving Focaccia Bread
- Focaccia bread makes great sandwich bread: You can make a loaf and then cut it into sandwich-sized squares before you slit it in half bun style.
- Foccacia bread pizza: This easy recipe also makes a fantastic pizza dough for the grandma-style pizza you make on a sheet pan.
FAQs
You can always freeze leftover focaccia. But who are we kidding? Fresh bread tastes way better than reheated, thawed-out frozen bread.
Active dry yeast has larger granules and needs to be dissolved in water before being used in recipes. Instant yeast is made of finer grains and can be mixed directly into the ingredients when making bread.
You can use all-purpose flour to make this recipe. The texture will be slightly different, but still make a very good focaccia loaf.
The secret to great focaccia is learning to develop huge bubbles. A few things go into this.
1. The high hydration of the dough (80-88%)
2. Using the fold and turn method.
3. Cold-proofing isn’t absolutely necessary, but it does give you the best flavor.
4. Lots of olive oil.
Hungry For More Bread Recipes?
Check out our in-depth Focaccia Bread tutorial for a deeper dive into making bread and toppings for focaccia.
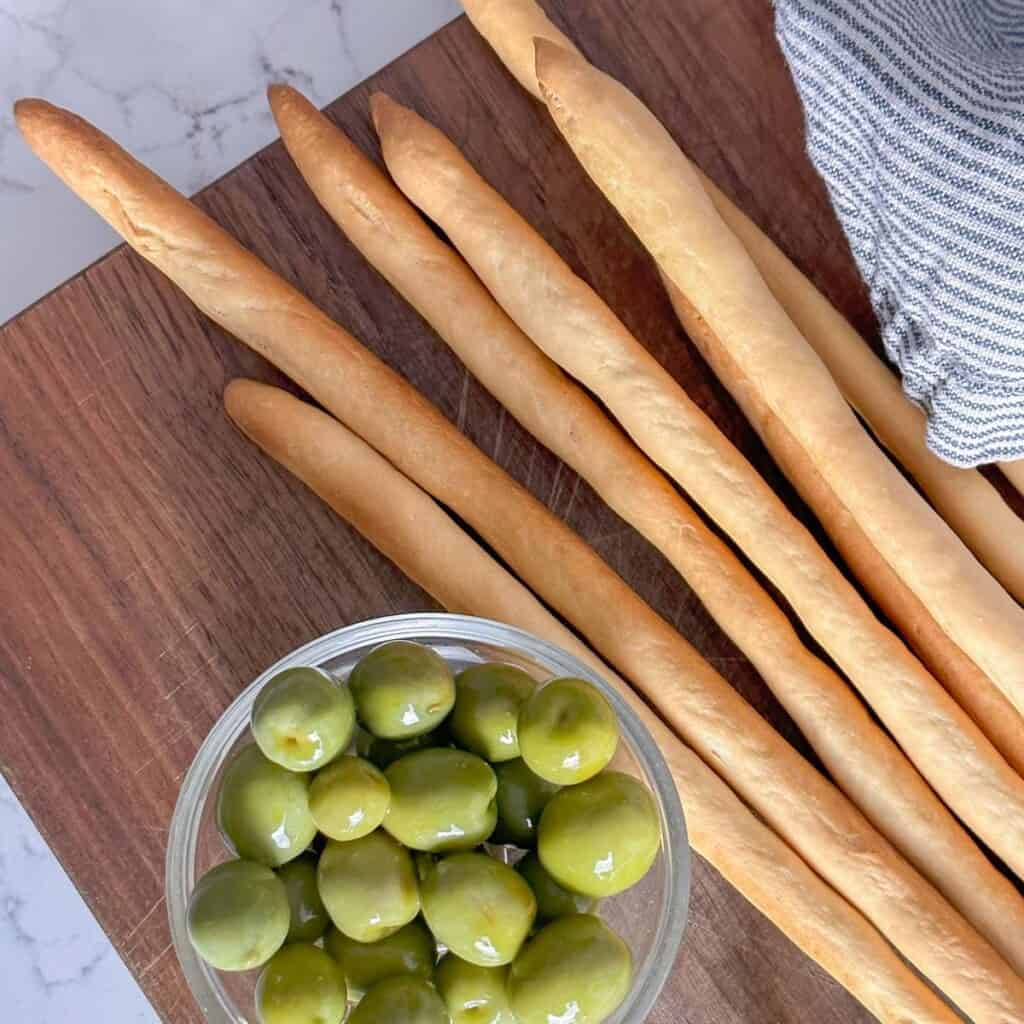
Then try more of our bakery-style breads like French Bread, Grissini Bread Sticks, and Fluffy Cinnamon Rolls.
Focaccia Bread Recipe
How To Make Italian Grissini Breadsticks
Irish Brown Bread

Irish Soda Bread
Bakery Style French Bread Recipe
Buttermilk Cornbread with Honey Butter
Banana Bread Recipe
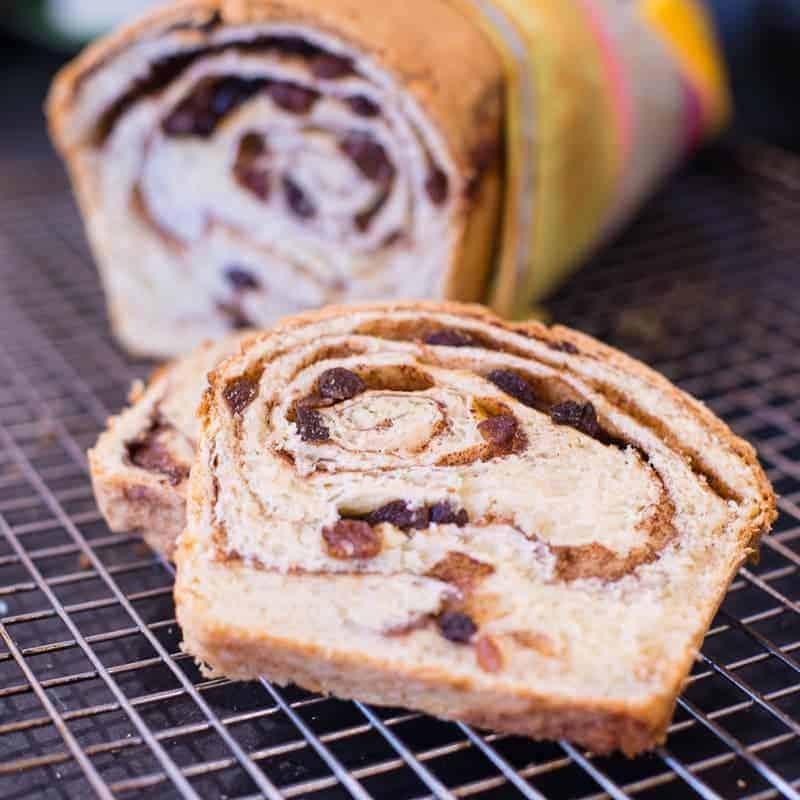
The BEST Cinnamon Raisin Swirl Bread
What To Serve With Focaccia Bread
A big green salad or savory dishes like Pork Ragu or Braised Short Ribs perfectly match freshly baked bread.

Caesar Salad With Dressing

Greek Salad Dressing Recipe
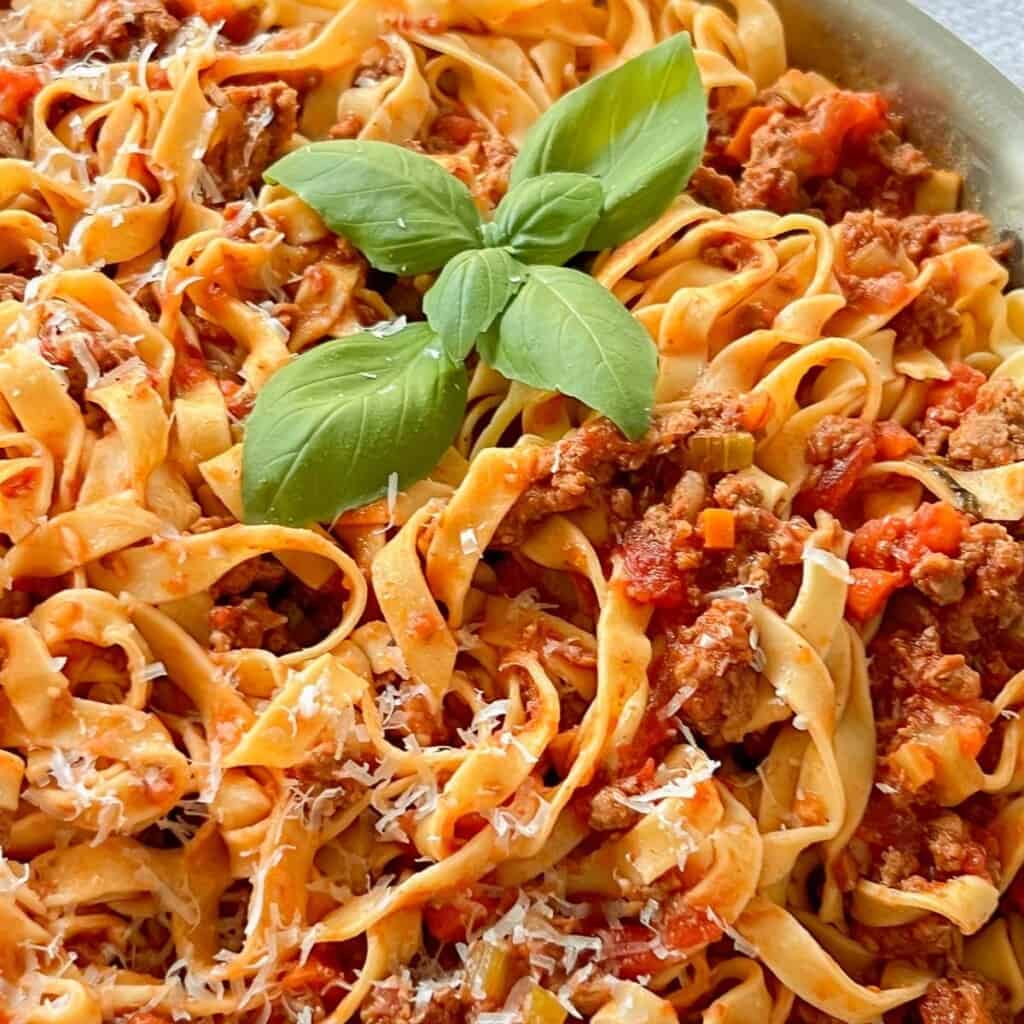
The BEST Bolognese Sauce Recipe
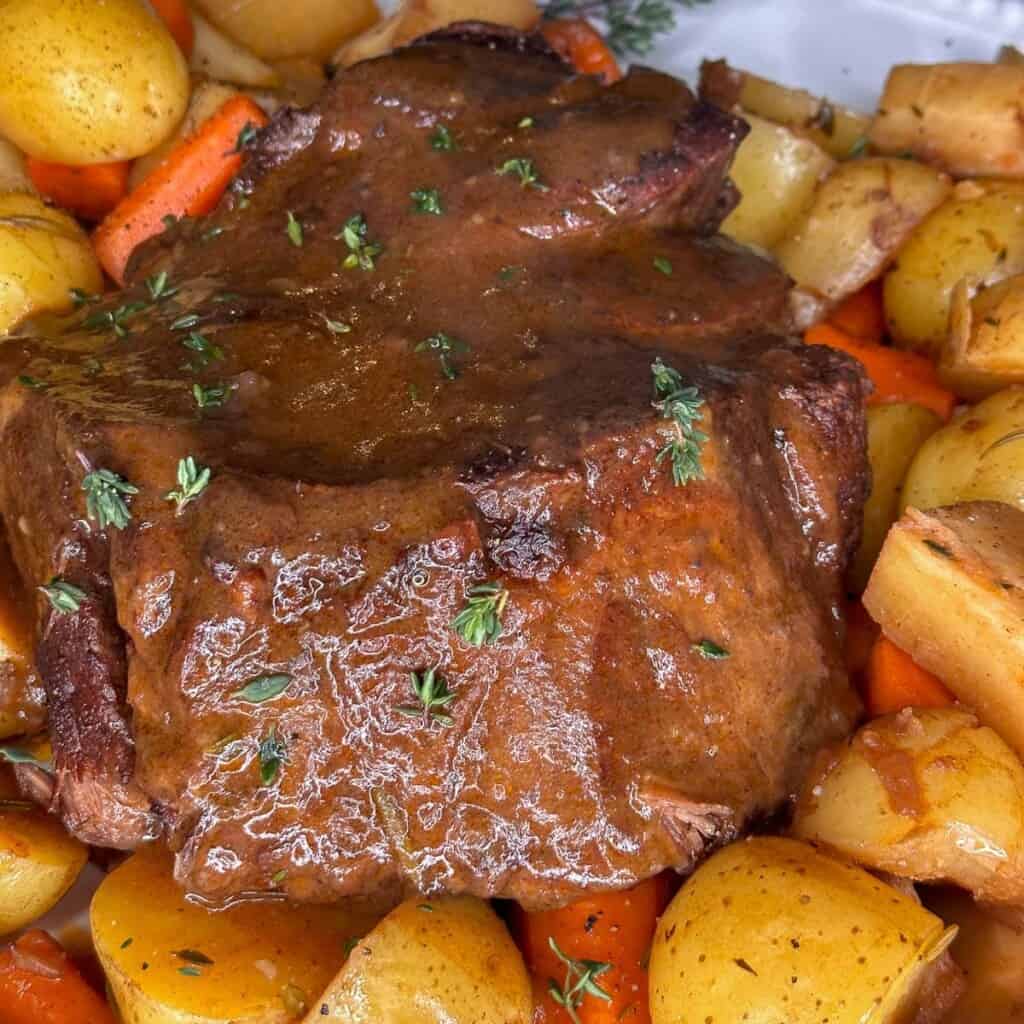
Pot Roast Recipe
Did you love this recipe?
Please leave a 5-star 🌟🌟🌟🌟🌟 rating and a comment below ⬇️
I love hearing from you in the comments; & your feedback helps other readers and helps me continue offering recipes at no cost. Drop a comment 👇
**Recipe update: My focaccia bread post was updated and improved on Oct 21, 2023. Updates include using grams instead of only cups in the recipe card. The amount of water was increased to yield a higher hydration bread, which allowed more air bubbles in the bread.
Foccacia Bread Recipe
Equipment
- 9×13 baking pan (affiliate link)
- digital scale
- baking stone
Ingredients
Foccacia Dough
- 500 grams bread flour (affiliate link), appoximately 4 cups
- 2 teaspoons instant yeast (affiliate link)
- 2 teaspoons kosher salt (affiliate link)
- 400 grams water (tepid), approximately 2 cups
- 1½ tablespoons extra-virgin olive oil
Toppings [add before baking]
- 11 ounces cherry tomatoes
- 1 bulb garlic cloves, broken into cloves, skin removed, and roasted
- 5 sprigs fresh rosemary, leaves picked off
- flaky sea salt, Maldon or Cypress Sea Salt
- extra-virgin olive oil, a drizzle before baking
Instructions
- Combine the ingredients: Add all the bread ingredients to a bowl. If you have a scale, weigh the ingredients directly into the bowl.500 grams bread flour, 2 teaspoons instant yeast, 2 teaspoons kosher salt, 400 grams water (tepid)
- Mix the dough: Mix the dough with a wooden spoon. The dough will be very wet and sticky.
- First rise: Scrape down the sides of the bowl and cover it with plastic wrap. We will be using the pull-and-turn method to develop gluten and large air pockets. Let the dough rest for 30 minutes. After 30 minutes, use hands moistened with water to pull one corner of the dough to the opposite side. Turn the bowl one-quarter, and repeat 3 more times. Recover the bowl and let it sit for another 30 minutes. You will repeat this process 3 times for a total of pull-fold-turns.
- Preheat your oven: Set up a middle rack. Set the oven to convection bake and preheat 400℉/204℃ (If you don't have convection, use 425℉/220℃)
- Second rise: Prepare a 9×13-inch baking pan. Generously oil a 9×13 baking pan. Gently dump the dough into the baking pan. Drizzle more olive oil onto the top of the dough. Cover the pan with plastic wrap and cover with a kitchen towel OR an inverted, rimmed baking sheet. Allow the bread to rise for one more hour. After one hour, drizzle the top of the dough with even more olive oil. Cover your fingertips in olive oil and press your fingertips into the dough. You want to press and jiggle to encourage the air to rise into the pockets.
- Add toppings: Add your favorite toppings to the top of the dough. Make sure the toppings are oiled so that they don't burn. See below for suggestions on the best toppings for focaccia bread.11 ounces cherry tomatoes , 1 bulb garlic cloves, flaky sea salt, extra-virgin olive oil, 5 sprigs fresh rosemary
- Bake: Bake the focaccia for 25-30 minutes until golden brown. Rest the bread for 10 minutes in the pan and then transfer it to a baking rack to cool. Cool for 15 minutes before slicing.
Laura’s Tips + Notes
- Everything Bagel Seasoning
- Rosemary, for a classic rosemary focaccia bread
- Caramelized onions and ricotta
- Kalamata olives and fresh oregano
YOUR OWN NOTES
Sign In to add your own private notes


This is the 3rd time I’ve made this foccacia bread. It is outstanding! Every time I make it, my guests rave and gobble down the entire batch. I have to admit, I never liked foccacia until I had this recipe. The texture is so wonderful; light yet slightly chewy, and flavorful with a fabulous crust. I like using grape tomato halves, fresh rosemary , oregano, and flaky sea salt. It is perfec!tion. Thank you for such a wonderful recipe.
Nilha,
Thank you so much for taking the time to send such a great review of this focaccia bread recipe. It makes my heart so happy to know that you are sharing this recipe with friends and family.
Laura
Hi can it b made withAP flour?
Nazia, yes absolutely. Bread flour is hight in gluten protein which gives the focaccia and chewier texture. But AP flour will yeild a softer fluffier loaf.
Nazia, yes this recipe can be made with AP flour. It will have a slightly different texture but still delicious!!
500 or 400? There are two different temperatures. You say gently dump into the pan, but you’ve spread it out haven’t you and not just dumped it in, poured more oil and covered? The pan rise is listed as one hour and also thirty to forty minutes. I’m trying to adapt bread recipes for my new Breville toaster as my old oven won’t reach high temps anymore so having the right temp is important for this. Thank you.
This is the best recipe I have found. It was delicious but I tried to put sundried tomatoes on it and they burnt. I put them in oil along with olives and toppings. Do you have any suggestions for that. Also I proofed the dough in the fridge for 24 hrs the first time and 72 hrs the second time I made the bread and I didn’t notice any difference in the flavour. They were both delicious!!!!
I’m wondering when you put your dough in the fridge for the long cold rise? I want to leave it for 2 days…do I do the initial first rise sequence then refrigerate for the second rise in the baking pan? Other recipes I have used this is usually what I do but wanted to confirm as you haven’t mentioned anything. Thanks
For a longer cold fermentation, you have two options.
1) You can expedite the first rise. You want to use the fold-over method to ensure the ingredients are combined and to fold air into the bread. So, instead of folding and turning every 30 minutes, shoot for every 10 to 15 minutes. Make sure to cover the dough with olive oil and seal the bowl with plastic wrap or other cover. When you remove your dough from the fridge, let it come to room temperature for about an hour. You can repeat the fold-over method a few times before your second rise.
2) Mix the dough and then toss it imeddiately into the fridge. Make sure to cover the dough with olive oil and seal the bowl with plastic wrap or other cover. When you take it out, let the dough come to room temp for about an hour, and then start with the fold and turn method listed in the first rise. Proceed with the second rise.
Did you change this recipe recently? I remember the recipe amounts being different, and it was the perfect amount for 2 sheets of focaccia bread. This used to be my go to recipe but now it’s different.
Kelly, I recently updated this recipe to use grams of flour. After testing this recipe many times, I found that the grams measured gave me more consistent results. I also added a smidge more water to bring the hydration of the dough up a little. This improvement allows you to get bigger bubbles during the rise. The dough you get will be the same as the original recipe. I baked my focaccia in a 9×13 baking pan to get a thicker loaf. However, you can still bake it on baking sheets for a thinner loaf.
Thank you Laura, didn’t the other version have honey in it as well? And I used to do it in the kitchenaid to mix my dough with bread hook and not do stretch and folds. Can I do it either way with the new version? Thank you ! Love the recipe so I will try this version too
Kelly, Yes, the other version did have honey. I’ve left it out because it’s not needed for rising or activating the yeast. It doesn’t add much flavor, either.
And yes, you can still use your stand mixer. I’ve been retesting this recipe for about 6 months, and I think this version is much improved in flavor and texture. It’s lighter and airier. It’s more like traditional focaccia bread.
I use a long ferment with my pizza dough recipe, which adds an incredible amount of flavor. I wanted to bring that to the focaccia bread, as well. I hope you love these tweaks as much as the original recipe.
I’d love to hear your feedback after you make this version.
Love this recipe. I’ve made it 4 times so far. I follow the directions exactly. I bake it in a Pullman pan with great success. I like using the recipe for a loaf of focaccia. A little olive paste, Italian meat, Italian cheese. Mmmmm. Best sandwich. It makes me feel Italian.
Thank you, Linda, for the review! I love hearing about how much you have enjoyed this recipe. Happy Cooking.
Made this tonight and it’s incredible!! I did not add the full amount of flour as it would have made the dough too dry. I also changed the toppings a bit. Served with spaghetti wHich was a perfect compliment! I also made a second half batch because I have a son who is gluten intolerant. I used King Arthur GF all purpose measure for measure flour and added 1 tsp Xanthan gum per cup of flour. It turned out really good, he loved it. Thank you for sharing this recipe!
Thank you for the review!!! I’m so glad you enjoyed this Focaccia recipe.
Can I use active sourdough starter instead of dry yeast?
Melody, yes, you can use active sourdough started. However, the fermentation process will have different timing. I am assuming that you are familiar with sourdough baking. If not send me an email and I can help you out.
At what point do u freeze the dough to use later?
Nancy, the best time to freeze the dough would be right before any rising time. Just pop the dough into a freezer bag or other airtight container. Thaw in the fridge before the first rise. I’ll update the instructions with detailed info on this step.
Approximately how long do you proof the dough into how first time? I know it says “doubles in size,” but I’m a numbers girl and wondered of you could give a ballpark number. Thanks!
Tessa, The first proof will take approximately 1 to 2 hours. It depends on the temperature of the dough.
My expert tip is to heat your water to 91 degrees F before adding it to the dough. If you do this, it helps to set the temperature of the dough so that the first proof is closer to an hour, almost every time.
Beginner question: In fact this is the first bread I have EVER attempted!
Do I follow the directions on the yeast packet (water, sugar) then add it in the mixer or just add straight from the packet? I have never used yeast before either.
Thanks!
Kelley
Kelley,
I’m so excited to hear how your first bread comes out!
For the yeast: you can just add it to the bowl with the rest of the bread ingredients. The warm water will activate it. The step of adding it to the warm water first is usually used to make sure that the yeast is still good. (no bubbles then the yeast is too old) However, I find that it isn’t necessary as long as you’ve purchased fresh yeast.
It was sooooo good! I halved the recipe, and now I am making it again for sandwiches!
Yay!!! Thank you so much for sharing. I’m super excited that your first-time bread baking was a smash.
Now you’re ready for my homemade french bread recipe. 😉
I know this says that gluten wheat is pretty much required to get the texture right, but I was wondering if there would be a way to make this recipe gluten free?? My family are majority gluten intolerant and I’ve been looking for more savoury, healthy baked goods to make. If not, thank you anyway and I’m sorry to be an inconvenience.
Sarah,
I have had really good success baking with King Arthur’s Gluten-Free Flour Blend. My best friend is gluten intolerant so I’ve made her several things using this. I would also recommend adding in xantham gum which will help to give you the chewy texture in the bread. If you add xantham gum add 1 teaspoon per cup of flour that you use.
If you do try it I’d love to hear how it comes out. I’m planning to experiment with so gluten-free and low carb baking this year. I’ll add this recipe to the top of my list.
What do you mean when you say a bulb of garlic “broken into gloves skin on”? I’ve never heard this expression before.
Thanks in advance,
Amy
Amy, I meant one head of garlic broken into cloves. Thank you. I will update it. I hope that helps.
I have no stand mixer . So I knead the dough by hand. Can I just use half portion of all ingredients ?
Thanks
Emily, Yes you can absolutely half this recipe.
I must say I was a little doubtful and thought that maybe there was an ingredient left out … almost threw it out and switched to another recipe … but the frugalness in me wouldn’t let me! I followed the recipe and sure am glad I did! I do wonder that I never saw any oil or salt in the dough …. I froze half the dough for pizza later .
Sherri, Thank you so much for the review. I’m so glad the bread turned out great for you. And it does make a great pizza dough as well.
Can you use wheat flour?
Tanya,
Yes you can definitely use wheat flour for this recipe. Just keep in mind that the dough will be heavier and may require a longer proofing time. I’d love to see the results if you do make with whole wheat flour.
Hello! Sounds delicious 😋 only question I have is if the garlic and sea salt is part of the dough, or is it a topping?
The roasted garlic and the sea salt is a topping. I add it before the final proof. That way the dough will rise around the tomatoes, and roasted garlic. You can add the salt after it comes out of the oven. I will take a look at the instructions and make them more clear. Thank you. 💜
The results were delicious! I did find the difference between your narrative instructions and the recipe hard to follow. I had to move back and forth quite a bit.
Nona,
Thank you so much for the review. And for the constructive criticism. I’m working on updating content here. In the beginning, I had no idea what my readers were looking for when they came to my site. I’m starting to figure it out and revamping almost all of my posts! A lot of my older posts are wordy and have absolutely nothing to do with the actual recipes, which I know are always amazing. Sometimes as I’m rewriting them, I seriously ask myself what I was talking about here? It looks like this one just got moved to the top of the list. 💜
How long does it sit for??
Erica,
After this bread comes out of the oven. I would let it sit for about 10 minutes before slicing into it! Happy baking.
-Laura
I have yeast in a jar – not envelopes. Can anyone tell me what amount is equal to “two envelopes”? Thank you!
Hi Heather,
2.5 teaspoons of jarred yeast is equivalent to one packet. I hope that helps. Let me know how it comes out.
Thanks so much, Laura! Making this now!
This was amazingly easy to make and turned out beautiful! I plan to play around with the toppings next. I did freeze some, reheated and then crisped up with quick toasting under the broiler. It was perfect!
I am so happy to hear that Kimber! I love this bread recipe. It’s great for sandwiches too!